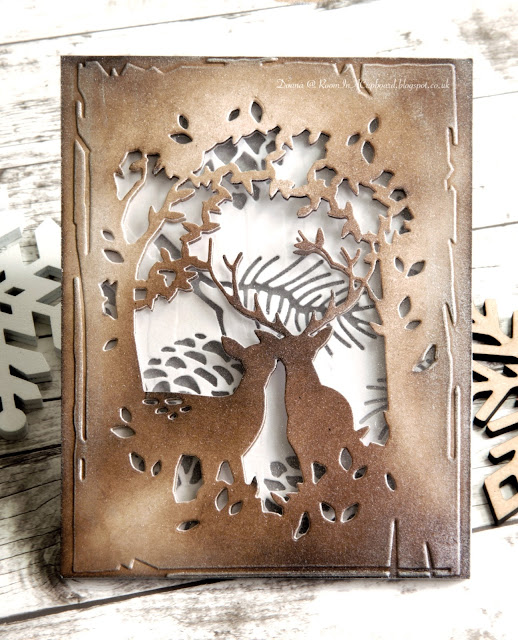
I've used my all time favourite die from last year's (2016) Memory Box September release and paired it with one of this years Holiday release dies to create something just a little bit different... a 'Picture Frame' - complete with attached easel.
Here's a few photo's so you get an idea of the depth created just by layering up a few die cuts between thin frames...
I did consider making this as a Diorama card, but opted for durability over any other consideration in the end. Plus what's the point in buying an Easel die if I'm not going to get lots of use out of it?
Have stash. Use stash.
Doesn't that give us "Crafter's" some Brownie Points somewhere along the way?!!
Anyhow...
You want to know how it was made?
I'll mix things up a bit from my usual format and give you the list of supplies used first.
Supplies Used:
Dies:
Memory Box 'Enchanted Deer' Collage
Memory Box 'Pinecone Collage'
Mama Elephant 'Peek A Frame' Creative Cuts
Sizzix/Bigz 'Small Easel'
Holtz/Distress Ink:
Ground Expresso
Walnut Stain
Hickory Smoke
Pumice Stone
Embossing Folders:
Darice 'Tattered Page'
Sizzix/Texture Fades 'Birch Trees'
Other:
Recycled acetate (from craft packaging)
Pebeo Gilding Wax - Silver
Crafter's Companion 'Spray and Sparkle' - Pearl Diamond
First of all, I inked up two pieces of card stock with the brown shades of ink. (I already had a 'mock' cut out of the Enchanted Deer Collage die so used that to help gauge where I wanted more/less ink to go).
Once happy with them, cut just the one Enchanted Deer to size - not both. These die 'cut outs' need to match up exactly so get the one sorted (using your embossing folder for dimensions) before getting the other one to size.
Leave to one side, and using the Pinecone Collage die with another piece of card, cut out either a random pattern that you like or one like mine where there are no 'free floating' branches to be seen.
Then ink up yet another piece of card using the grey shades of ink.
With me so far..?
Now leave all of that to one side for a minute and make the frames that will be used to sandwich the layers together.
I used the biggest two dies from the Mama Elephant 'Peek A Frame' set to make two frames - and I doubled up the layers (which means cut out four - not two). The main thing here is that the frames made are the same size as the Enchanted Deer 'cut outs' - and that they aren't too thick. Even with mine I had to trim off a tiny piece that was peeking through into the 'picture'.
Whilst the glue on the frames dries, emboss one of the Enchanted Deer die cuts using the 'Tattered Page' Embossing Folder and emboss the Pinecone Collage 'cut out' piece using the 'Birch Trees' Embossing Folder.
If everything hasn't been cut to the same size, do that now.
Then cut out a piece of card thick enough to be your base. My easel has also been cut out from the same cardboard so the colours match. (The thicker, the better. I used some recycled 'grey board' used as packaging that came with some of my craft goodies. Wish I knew how to get hold of this stuff commercially as my store of it is limited).
Now it's sandwich making time...
Glue the grey inked piece to the card base.
Then glue on one of the frames.
Now add the Pinecone Collage Cut out, gluing that just to the frame - nowhere else.
Now comes a tricky part...
Hold your two Enchanted Deer Collage 'cut outs' together - both facing the right way up and the embossed one on the top. Turn both upside down whilst still being held as one piece so that glue is on the underside of the bottom layer only. Now turn both back the right way up - whilst still holding them together.
(The trick here is to hold on to this die cut 'sandwich' in such a way that the two 'die cuts' look as one. Once you've got that sorted, match up the edges of the 'sandwich' with the parts already glued into place).
Press firmly 'round the edges and then put that top, unglued die cut to one side for a minute.
Add that second frame and glue into place - being sure that you won't be able to see any of it once that final 'die cut' is on the top.
Now I made a choice at this stage to add my acetate to the back of the Enchanted Deer Collage 'die cut' before spraying on the glitter. It gives the grey of the pinecones a softer look - not that dissimilar to when you add vellum over bright, bold colours to tone them down.
So either do as I did and add the acetate before spraying or spray now, leave to dry and then add that acetate layer.
But either way, add a smidge of gilding wax along the edges first - where the 'Tattered Pages' are showing. It just adds that 'someting extra'...
Once it's all been sandwiched together I suggest you put it under some weight for a while - and add the easel into place on the back at some point after it's all had plenty of time to dry.
Then, once completely dry, add some very thin Kraft card slivers to the sides of this frame to cover over the sandwiched layered edges and make it more 'frame like' in appearance.
Finished...
... and the perfect thing to add to my craft stall for Christmas...
This was made to play along with the latest Memory Box Challenge.
Challenge #26
I play here often as I love their dies!
Other Challenges I'm Entering...
You've Got The Edge
Christmas In July
Thanks so much for stopping by today...
Donna. x


