Showing posts with label Bauble. Show all posts

Monday, 7 October 2019

Happy Little Stampers, ATC Challenge, Anything Goes With A Set Of Three

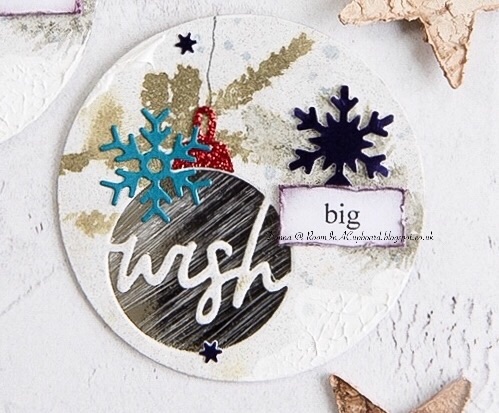
It's 'Anything Goes With A Set Of Three' over on the Happy Little Stampers ATC challenge today...


Here's a close up of each coin...


*


You'll need two coins for this project.  (The top layer has been cut from cereal box card and the bottom layer from Silver 'Mirri' Card).


With a piece of sand paper, gently scratch away some of the top layer on the Mirri card using a back and forth motion.
(That's the bottom layer finished)!


Apply White Gesso to the cereal box layer and leave to dry.

Then cut out the Sizzix Thinlits Circle Words (Tim Holtz).


Stamp the left foliage image using Memento 'Olive Grove'.
 Once dry, stamp over again using Ranger 'Perfect Medium'.
Then add Clear Embossing Powder, heat set and leave to cool.


Stamp right foliage image using Holtz/Distress 'Forest Moss'.

Then add snow spots using Holtz/Distress 'Weathered Wood'.


Using a Memento 'Tuxedo Black' marker, add "strings" for the bauble to hang by before gluing down the top of the bauble itself.


Now glue the two layers together and spray using Glitter Varnish.


Add some die cut snowflakes...  then print off the text.

Cut text to size, distress edges and then add Holtz/Disress 'Dusty Concord', 'Seedless Preserves' and 'Hickory Smoke' around the edges.

Spray with varnish to seal the ink, then glue into place as shown.

Add white acrylic paint to the edges.


*


Want to join us?

Here's a reminder of the rules...


1. You must create an ATC. We accept both cards and coins. You must follow the theme.
2. Link back to your blog post and not your entire blog
3. Provide a link to HLS in your blog post
4. You may enter as many times as you like but each entry must be different
5. You may enter as many other challenges as you like
6. Have fun!

CARDS -
• measure 2.5 x 3.5 inches (64 X 89 mm)
• be traded for other cards - not sold
• be flat enough to fit into a plastic trading card sleeve

COINS -
• measure 2.5 inches in diameter using heavy cardstock
• be traded for other coins - not sold
• be flat enough to fit into a plastic trading card sleeve


Thanks for stopping by!


Donna. x
https://www.instagram.com/roominacupboard/?hl=en

Tuesday, 6 November 2018

Craft Consortium, Bird/Bauble/Gift Box, Mixed Media

The beauty of The Essential Craft Papers (sold by Craft Consortium) is that they do mix and match together so well with the existing Premium Paper Pad collections...  which opens up a whole new world of craft possibilities.


Here's one idea on today's craft project...


I've combined die cuts from the Vintage Emporium collection to decorate a paper covered MDF bauble...  which in turn becomes the decoration for this gift box (made using one of the many papers from the Little Fawn And Friends collection).


Silver Gilding Wax has been added to the gift box lid.

I've also dry brushed white Gesso on to the paper covered bauble and added ink to some of my die cuts...

...  which in turn creates this mini 'nature inspired' scene.


*


The Essential Craft Papers


Little Fawn And Friends 


*


Hope I've inspired you in some small way...


Donna. x

Monday, 5 November 2018

Craft Consortium, Christmas Bauble, Mixed Media

Craft Consortium have introduced 'The Essential Craft Papers' to their ever growing collection.

My project for today focuses on papers from two of the four designs that are currently available  (there are more to come), so please do pop on over to the shop to see the full range for yourselves.


Here's today's Mixed Media project...


I've kept it fairly simple as I want the full focus to be on the MDF bauble that's been decorated using an image from the Vintage Emporium collection, and backed using one of the many wood effect papers from Wood Textures. 

As you can see, the advantage to these papers is that there is scope for a little bit of decoupage!


So how was it made?


*


Find this floral image in the Vintage Emporium collection (you will need both of them).

Using the MDF Christmas Bauble & Stencil Kit, take the largest Bauble and glue on the floral design.

Once dry, roughly cut around it and then sand down the edges.  


Add green Gilding Wax around the outer edge of the Bauble and silver Gilding Wax around the inner edge of the design.

Then, cut out individual elements from the duplicate flower and glue them on.


Then add the Rhinestones...


The background is a piece of Mount Board covered with my chosen Wood Textures paper (with an easel stuck to the back).

I've added more silver Gilding Wax around the outer edges as well as using Texture Paste, then simply added two silver die cut stars and one kraft die cut star.


Make a hole in the Mount Board and attach the Bauble using silver thread.


It couldn't be easier!


*


Here's a list of the Craft Consortium supplies used...


The Essential Craft Papers


Always & Forever


*


There really is so much scope with these beautifully designed papers.

I'll be back later in the week with a few more ideas to share.


'Bye for now...


*


Donna. x

Thursday, 27 September 2018

Penny, Black, Christmas Baubles Tag, Guest DT 2018

I'm sharing a Mixed Media tag with a Clean And Simple feel to it for my
Penny Black
Guest DT post today.


And I'm also sharing this design specifically to highlight the difference it can make when you add layers for dimension behind a die cut.


See that top bauble that lies quite flat compared to the others?

That's a die cut with no additional same shaped layer behind it.


And the one at the bottom?

That's got two white bauble layers behind.  

Two for extra strength and white to match the colour of the back of the tag.


And the corrugated cardboard bauble?

That also has two extra layers, but see how much more definition you get - especially when you double up again with a Gingerbread Man that has an additional layer behind it, too?


This is one of the things I love most about crafting.

Adding dimension always gives me a sense of achievement.


And to balance this all out, I've added die cut embossing detail into the baubles - which needs to be done prior to gluing the layers together.


So how was this tag made?


*


Firstly, cut out Tagged twice using White card stock - and put one to one side for later.
(You will need to cut this twice as one will be used to hide the thread).


Then using a Stamping Positioner Tool, colour and stamp A Berry Branch using the following Tsukineko Marker Pens:


Olive Grove
New Sprout
Cottage Ivy
Bamboo Leaves
Pistachio
Expresso Truffle
Rhubarb Stalk
Love Letter 
Lady Bug


Once dry, cover the entire tag with a layer of Ranger/Distress Collage Medium - Crazing and then leave to one side.


Next, cut out the Baubles from Ornaments Kit.


I've used the matt silver card stock from Tim Holtz/Core'dinations - Kraft-Core Metallic Collection to cut out my small and medium sized Baubles.

I've then used the Sprig from Christmassy to die emboss the small Bauble and the Holly from
Mitten Stocking to die emboss the medium - and as mentioned earlier I've then layered up the medium Bauble by gluing on a further two White die cuts to the back.


Then cut the largest Bauble, using corrugated card for the top layer and White card for the two layers that go underneath.


Add Ranger/Texture Paste to this corrugated die cut and leave to one side to dry.


Cut out two Gingerbread Men from Mitten Stocking - one from a scrap of Brown glitter card and the other from White Card.


Using the following Tim Holtz/Distress colours, ink up the White Gingerbread Man:


Spiced Marmalade
Walnut Stain
Pumice Stone
Gathered Twigs


Then glue the two Gingerbread Man layers together, coat with a layer of
Ranger/Distress Collage Medium - Matt and glue into position on the Bauble.


Using a needle and thread, attach the Baubles to the tag as shown.


Then glue on the Gingerbread Man and the word Joy from Xmas Poinsettia Cut Out.


And finally...  glue the White, blank Tagged die cut into position to hide the threads - and add
Ranger/Texture Paste as pictured above.  (Using your finger).


*


As 'messing with layers' brings me such joy, I couldn't think of a more appropriate die cut sentiment to add!


*

Supplies used:


Penny Black/Stamp

40-631     A Berry Branch


Penny Black/Dies

51-007     Tagged
51-450     Ornaments Kit
51-465     Mitten Stocking
51-453     Christmassy
51-474     Xmas Poinsettia Cut Out


*


I do hope that my 'How to' guide explained all that you need to know.

If not, please feel free to contact me.


Thanks for stopping by...


*

Donna. x

Wednesday, 13 December 2017

8x8 Wedding Display Piece, Christmas, Easel Backed

Way, way back at some point during the early summer months of this year I was asked if I would make a display piece for a Christmas Wedding - using Royal Blue, Silver, Cream and White.
My only other part of the brief was that it had to look 'Christmassy' AND suit a wedding theme of ribbons and baubles.

So I made a start on this design months ago, shelved it away and came back to it recently to finish it off.

I've never met who it's intended for.

Hope she likes it!


My main challenge for this design was that I hate, loathe and detest the colour blue!
I've never liked the colour - even as a child.


Now I've just got to figure out how much to ask for it!


Stay warm, friends.
Spring will be back eventually!


Donna. x

Sunday, 26 November 2017

Christmas Bauble Tag, Joyful, Minimal Colour Palette

I decided on a CAS, but not CAS tag for Day 25 of Tracey's 25daysofchristmastags2017 event.

Confused?

Let me show you...


As you can see, it's not CAS at all because there is simply too much going on,
but with all that white and so little colour...  that's how you create the illusion of CAS.
And I love this effect!


Today's inspiration?


The similarities are there, aren't they?


Just one more tag to go!!!


Donna. x

Monday, 20 November 2017

Bauble Tag, Wreath, Joyful, Christmas

My tag for Day 14 of Tracey's 25daysofchristmastags2017 challenge is a Christmas Bauble...  


My inspiration?

That actually came from two different sources today...


I couldn't help myself!
Once the idea was in my head, that was it...


Many thanks for stopping by...


Donna. x