Showing posts with label ATC Coins. Show all posts

Friday, 6 December 2019

Happy Little Stampers, ATC Challenge, Bling

This is my last post for a while as I'm moving!


Not only to a new house, but to a whole new town and a whole new way of life...  

The house is a renovation project so we'll be busy for a while, but my priority will be getting my craft room up and running smoothly just as soon as I can.


It's just that it's going to take a long, long while!


*


My post for today shows a theme I'm less than comfortable with...  'Bling' just really isn't me at all!
So I've opted for a subtle style of bling that still heavily relies on lots of shimmer and shine.


A fair compromise in my book!


Do head on over to Kylie's blog and click on her challenge pages.


ATC's are just one of her many, many  challenge options... 
so you are sure to find at least one you enjoy!


*


Thank you so much for taking the time to stop by today...

Donna

Wednesday, 27 November 2019

Craft Consortium, The Emporium, ATC Coins

If you saw yesterday's post you will know that I made a mini storage crate using the new
'The Emporium' release (sold by Craft Consortium).


This is Part 2 of that project...    3 ATC coins that fit inside with plenty of room to spare!


Here's a close up of each coin in turn...


...  plus a look at Part 1 (the storage crate) if you missed it yesterday!


Click HERE to see the full 'The Emporium' product range.


Huge thanks for stopping by!


Donna.x

Wednesday, 6 November 2019

Happy Little Stampers, ATC Challenge, Die Cuts

I'm over on the Happy Little Stampers challenge blog today with an ATC Coin that's jam packed full of layers and texture.


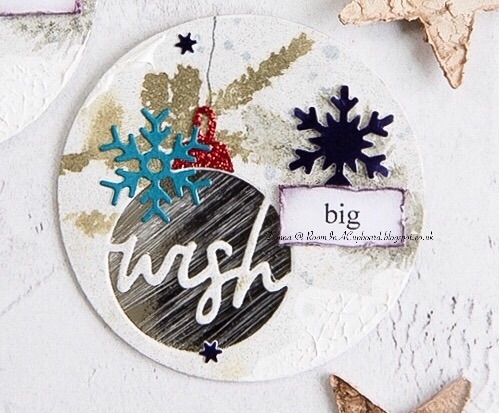
Here's how it was made...


Using the Tim Holtz CLOCKWORK stencil, add WHITE Texture Paste and leave to dry.

Then daub on Holtz Distress Inks in WALNUT STAIN and GROUND EXPRESSO.


Once dry, add some water splashes to tone down the ink a little...  and leave to dry (again) before gently adding the tiniest amount of WHITE acrylic paint.
 (Use the dry paint brush/stipple technique).


Cut a scrap of SILVER ribbon to size and attach as shown, (note the angled edge), then add a second piece of ribbon with a contrasting texture.  Fray the edges if desired.


Then take the largest of the dies from the Penny Black HEART CHARM set, cut out three and glue them together.

Once dry, paint with RED acrylic ink...  and once dry (yet again!) smear across a JET BLACK Stazon ink pad - going from top left to bottom right.

Add CLEAR embossing ink in exactly the same way, then Heat Set using CLEAR embossing powder.


Repeat the CLEAR embossing ink/Heat Set TWICE more, going top left to bottom right once again for the second layer...   but reversing top right to bottom left for the third.

Then add some string and glue both the Heart and the edges of the string in place as shown.


Cut out TWO smaller hearts in WHITE and spray with SILVER glitter varnish before attaching to the coin base.


Then write the word LOVE on to a scrap of the same WHITE card, cut to size and distress the edges carefully using the blade on a pair of scissors.

Spray with varnish and glue in to position.


Now comes the fun part for me as it's all looking far to neat and tidy..!


Using your finger, add on some SILVER Pēbēo Gilding Wax, then (using the dry brush/stipple technique again) gently add a small amount of BLACK acrylic paint.


Do the same with a different dry brush, only this time daub on WHITE acrylic paint with a 'heavier hand' so that it's clearly more visible.


Attach two contrasting small gems...  and you are finished!


*

I hope you have time to join us!

Here's a reminder of the rules...


1. You must create an ATC. We accept both cards and coins. You must follow the theme.
2. Link back to your blog post and not your entire blog
3. Provide a link to HLS in your blog post
4. You may enter as many times as you like but each entry must be different
5. You may enter as many other challenges as you like
6. Have fun!

CARDS -
• measure 2.5 x 3.5 inches (64 X 89 mm)
• be traded for other cards - not sold
• be flat enough to fit into a plastic trading card sleeve

COINS -
• measure 2.5 inches in diameter using heavy cardstock
• be traded for other coins - not sold
• be flat enough to fit into a plastic trading card sleeve


*

https://www.instagram.com/roominacupboard/?hl=en
Donna

Monday, 7 October 2019

Happy Little Stampers, ATC Challenge, Anything Goes With A Set Of Three

It's 'Anything Goes With A Set Of Three' over on the Happy Little Stampers ATC challenge today...


Here's a close up of each coin...


*


You'll need two coins for this project.  (The top layer has been cut from cereal box card and the bottom layer from Silver 'Mirri' Card).


With a piece of sand paper, gently scratch away some of the top layer on the Mirri card using a back and forth motion.
(That's the bottom layer finished)!


Apply White Gesso to the cereal box layer and leave to dry.

Then cut out the Sizzix Thinlits Circle Words (Tim Holtz).


Stamp the left foliage image using Memento 'Olive Grove'.
 Once dry, stamp over again using Ranger 'Perfect Medium'.
Then add Clear Embossing Powder, heat set and leave to cool.


Stamp right foliage image using Holtz/Distress 'Forest Moss'.

Then add snow spots using Holtz/Distress 'Weathered Wood'.


Using a Memento 'Tuxedo Black' marker, add "strings" for the bauble to hang by before gluing down the top of the bauble itself.


Now glue the two layers together and spray using Glitter Varnish.


Add some die cut snowflakes...  then print off the text.

Cut text to size, distress edges and then add Holtz/Disress 'Dusty Concord', 'Seedless Preserves' and 'Hickory Smoke' around the edges.

Spray with varnish to seal the ink, then glue into place as shown.

Add white acrylic paint to the edges.


*


Want to join us?

Here's a reminder of the rules...


1. You must create an ATC. We accept both cards and coins. You must follow the theme.
2. Link back to your blog post and not your entire blog
3. Provide a link to HLS in your blog post
4. You may enter as many times as you like but each entry must be different
5. You may enter as many other challenges as you like
6. Have fun!

CARDS -
• measure 2.5 x 3.5 inches (64 X 89 mm)
• be traded for other cards - not sold
• be flat enough to fit into a plastic trading card sleeve

COINS -
• measure 2.5 inches in diameter using heavy cardstock
• be traded for other coins - not sold
• be flat enough to fit into a plastic trading card sleeve


Thanks for stopping by!


Donna. x
https://www.instagram.com/roominacupboard/?hl=en

Friday, 6 September 2019

Happy Little Stampers, ATC Challenge, Ocean/Sea

It's time for a new ATC challenge over at Happy Little Stampers, with a theme this time of 
Ocean or Sea.


I've chosen to make a double layered ATC coin...  and yes, it is another Mixed Media piece!

Want to know how it was made?


*


Start by cutting out two coin shapes from kraft card.

Add Brusho (Grey) to the one layer and leave to one side to dry.

Cut out two dolphins from the other layer, then cover roughly in PVA glue to build up some texture before adding a layer of White Gesso (Stipple on - not brush strokes).

Mix in a few drops of Stormy Sky Distress Ink (Tim Holtz) to a little more White Gesso and stipple that randomly to your top layer.   Once dry, simply use a piece of sand paper to distress the coin in a few places around the edges.  

Using Ranger Archival (Shadow Grey), stamp on a few 'Bubbles'.  (I used a snow effect stamp for this).

Glue the two layers together.

Then add your die cut shapes...

...  and one sequin as shown!


*


Can you see the hint of Rust Powder I used on the star fish and the brown piece of sea weed?


Want to play along?


1. You must create an ATC. We accept both cards and coins. You must follow the theme.
2. Link back to your blog post and not your entire blog
3. Provide a link to HLS in your blog post
4. You may enter as many times as you like but each entry must be different
5. You may enter as many other challenges as you like
6. Have fun!

CARDS -
• measure 2.5 x 3.5 inches (64 X 89 mm)
• be traded for other cards - not sold
• be flat enough to fit into a plastic trading card sleeve

COINS -
• measure 2.5 inches in diameter using heavy cardstock
• be traded for other coins - not sold
• be flat enough to fit into a plastic trading card sleeve


*


Tuesday, 6 August 2019

Happy Little Stampers. ATC Challenge, Time

I've gone with the simplest of ideas for my Happy Little Stampers ATC coin today...


The challenge theme for this month is 'Time'...

I would be fibbing if I said this was my first idea, but given the size of an ATC coin and my lofty ambitions I had to ditch that!  Plus, I think this beautiful sentiment fits the bill nicely...  past, present and future are all to do with time, after all!


How was it made?


*


Start by brushing even strokes of Red acrylic paint on to your coin.

Once completely dry, use sand paper and (following the direction of the brush strokes) gently sand back and forth.
(This lifts the paint from the edges to give a worn, aged look).  


Stamp on the sentiment using Stazon Jet Black ink and a Stamp Positioner Tool.

Do not remove the coin or the stamp!
Instead, use a Uniball Signo White pen to highlight parts of the sentiment and then stamp over using Ranger Perfect Medium.  

Heat emboss using Clear embossing powder.


Using White acrylic paint and a finger, gently run around the edges of the coin.  Don't worry if the paint is not even...  that's the look we want!


Add three small White flowers to finish.


*


Want to play along but you are unsure of the rules?


1. You must create an ATC. We accept both cards and coins. You must follow the theme.
2. Link back to your blog post and not your entire blog
3. Provide a link to HLS in your blog post
4. You may enter as many times as you like but each entry must be different
5. You may enter as many other challenges as you like
6. Have fun!

CARDS -
• measure 2.5 x 3.5 inches (64 X 89 mm)
• be traded for other cards - not sold
• be flat enough to fit into a plastic trading card sleeve

COINS -
• measure 2.5 inches in diameter using heavy cardstock
• be traded for other coins - not sold
• be flat enough to fit into a plastic trading card sleeve


*

Come and join us!


*


Donna. 
https://www.instagram.com/roominacupboard/?hl=en

Saturday, 6 July 2019

Happy Little Stampers. ATC Challenge, Floral

If you know me at all you will know that my first love has always been for die cuts.
 Then it was tags, then mixed media, then 3D projects...  and now it's ATC coins!


Here's my very first one.
They really are such fun to make!


...  and I'm sharing it with you today as I'm now officially part of Kylie's Happy Little Stampers gang!


You will see if you head on over to the left hand side on the challenge blog and click on 'ATC Challenge' that the rules are very straight forward:


1. You must create an ATC. We accept both cards and coins. You must follow the theme.
2. Link back to your blog post and not your entire blog
3. Provide a link to HLS in your blog post
4. You may enter as many times as you like but each entry must be different
5. You may enter as many other challenges as you like
6. Have fun!

CARDS -
• measure 2.5 x 3.5 inches (64 X 89 mm)
• be traded for other cards - not sold
• be flat enough to fit into a plastic trading card sleeve

COINS -
• measure 2.5 inches in diameter using heavy cardstock
• be traded for other coins - not sold
• be flat enough to fit into a plastic trading card sleeve


My coin has a base layer of gesso brushed on from left to right with just a hint of Distress Broken China added in to it.

Once dry, I've brushed on some more gesso - this time mixed in with a drop of Distress Stormy Sky re inker (and using up and down strokes this time). 

Add a sentiment using Stazon Jet Black ink.

Then add Texture Paste using the Dusty Attic Grid stencil.

Glue on a die cut branch and trim to size.

Then cut out two flowers, paint with Red acrylic paint and leave to one side to dry.

Cut out a stamen, watercolour with various shades of Green, shape lightly with a flower shaping tool (ball end) and then cover in Ranger Glossy Accents.

Attach flowers to branch, glue on the stamen and then add a Green gem as shown.  

Cut out one tiny flower and colour using Distress Dusty Concord and Seedless Preserves.
Once dry shape slightly,  add a splodge of Posca Metallic Silver to the centre and attach to the coin.

And finally...  

Add some Pebeo Silver Gilding Wax to the flowers ...  and just a touch to the coin itself.


*

I hope you have time to join us!


*


Donna