Showing posts with label Holtz. Show all posts

Wednesday, 29 November 2017

Craft Consortium, Winter Woodland, Decoupage + Squirrel Clock Face

Good morning, everyone!
It's another cold and frosty one here in the UK, and as anyone who knows me can tell you - I am no fan of the cold.

So I've turned things around for this project today using just one topper from Craft Consortium's Winter Woodland collection - just because it says Winter doesn't mean that's all you have to use it for!


But if you don't like squirrels you should look away 'round about...  now!


For those of you that do love them, however...
Isn't this just the sweetest topper ever?

And such a good size, too.


Such a cutie deserved pride of place on my project for today, so I placed it slap bang in the middle of this clock face.

And why not?


Take a look 'round the back...

See, it has an easel backing that folds flat - which means that this could easily be given instead of a card.
Just attach a label and write 'Happy Birthday' on it or something...


I don't get 'cards' like this...  
so maybe I should squirrel this one away (tee hee) and keep it for myself?

What do you think?


*

Craft Consortium supplies used:

Winter Woodland

Always & Forever

Santoro - Kori Kumi
Leaf Ribbon Set

Decoupage Paper
Seaspray
Metallic Copper


*


As always, I've attached my decoupage papers using spray adhesive.


Here's a closer look at the bottom layer... 


Can you see how I scrumpled up that clock face Decoupage paper to get that crackle effect?


I also smeared brown ink all over the front, left it for a minute or two and then wiped it all off.
Why?

Because the ink seeps into the creases and tones down the shine.
I'm a muted kind of shine girl by nature, you know!


Want to see some more inspiration?

Tune in to Create and Craft TV (11am UK time) today.
That's 29th November, 2017. 
I'm pretty sure I've even heard that there's a sale on! 
(If you are reading this at a later date - sorry, you've missed it)!


But maybe next time...


Donna. x

Friday, 15 September 2017

Christmas Tag, Noel, Partial Snowflake

Tag You're It is back!!!

And what better way for me to say hello to you all on behalf of my very lovely team mates than to remind you that (like it or not) Christmas is coming...

Did I hear groans or 'whoops' coming from you, I wonder?

I have a very glittery tag to show you today...


...  and it's based this week on inspiration from the very lovely Tracey McNeely.


Now isn't that inky loveliness if ever there was any?


You may be wondering just how on earth my design came from this, but in reality that's an easy one to answer...


You see, Tracey's choice of stamp reminded me of a snowflake as soon as I saw it - and I had the perfect intricate die in mind.
So I turned things on their heads a little by pairing it with a tag that's not a tag, made the main focus  white by hiding similar colours to Tracey's tag underneath my main design and I made a feature of the sentiment, too.
Yet for all of that I've still got an equal amount of lovely 'white' space - even with two sequins that may have worked their way in somehow!


So how did I make my tag?


Let me tell you the supplies I used first...


*


Supplies Used:

Dies:
Penny Black - 'A Pocket Full'
Memory Box - 'Dazzling Snowflake'
Sizzix/Holtz Thinlits - 'Vintage Tidings'


Holtz/Distress Inks:
Hickory Smoke
Seedless Preserves
Dusty Concord

Other:
Sequins
Cord
Glitter Card - Black
Crafter's Companion/Spray & Sparkle Glitter Varnish - Silver


*


Take two scraps of card that are big enough to cut the notepaper die from and run them separately through your die cutting machine.

On one, ink up randomly and quite lightly with Hickory Smoke.
Add some water droplets (I just use wet hands and shake or clap them over the top), dab up the water with a paper towel and leave to dry.  Add more ink if desired and more water droplets until happy with the overall effect.
Then, once dry, place the snowflake die so that it's centre is fairly close to the edge and it's top is peeking out a little over the top edge of the tag.  Tape into place with slightly tacky tape (to prevent paper tearing on removal) and run through your die cut machine.
Then spray with Silver Glitter Varnish.

On the other, add random blobs of Seedless Preserves and Dusty Concord.

Glue the two tag shapes together.
(You will notice that I took the decision to turn one of my tag shapes back to front before applying ink so that the two don't quite marry up at the top.  It's a personal preference thing as I wanted a slightly more distressed look.  I also removed a small section at the top to let the colour underneath show through a little more).

Cut out the sentiment die three times and glue them all together.
Then once dry, glue into place...

Add a hole in the corner for the cord...

And add two sequins.


So there you have it.
A tag that isn't a tag...  that is a tag.

And why not?


*


I hope you have the time to come and join us.
We've gone back to our old format - so don't forget to check in on the main challenge page to see the closing date!


'Bye for now...

Donna. x

Wednesday, 28 June 2017

Distress Crayon Card, Rainbow of Colour, Thanks

There's a Poppystamps challenge that's almost at its end, but I've managed to make 'something' for it.  I say 'something' as at home I refer to this as my 'Crayola card made by a three year old'...
Crayola's not just a UK brand, right?
  
Take a look at you'll see what I mean...


It's kind of hideous...  but it kind of works (I think/hope)!

I don't embrace lots of colour so I'm never going to say anything too wonderful about this design - but at least I chucked in lots of white (or similar) where I could. 

And no...   I didn't really use Crayola Crayons.

Distress Crayons - use a light coat of Distress Collage Medium - Matt (or similar) to cover the card base first.  Helps the crayons to blend when smooshing colours.
But do use a dry baby wipe to smoosh/blend colours or your finger will start to get very warm!

And yes, as you can tell I went for a smooshing/scribbled look.
But then I don't do 'neat'...  it kind of freaks me out.

So I've smooshed and I've scribbled.
And I've embossed onto vellum, recycled an old purse only fit for the bin, made a tiny box frame that yes, I did purposefully choose not to stick together too neatly...
and I've done some 'selective' distressed edges.
Because I can and I like them.
And no distressed edges was too neat and all distressed edges would have been too much.
Perfect logic...

I've also messed around with layers - that 'thanks' has six or seven and the centre of the daisy in the frame has even more.  Seem to remember it being in the 'teens' somewhere  (didn't want to use sticky pads as used those under the frame).
There are also a few layers on the butterfly, the cream 'purse' flower centre and that rectangle underneath the vellum has a few, too.

I like messing with layers as it adds something depth wise...  but apparently camera's aren't so keen  - hence the blurriness in some places.
It's also very time consuming and no fun at all.

But at least it kept me busy for a while...


Supplies Used:

Holtz/Distress Crayons:
Festive Berries
Spiced Marmalade
Mustard Seed
Twisted Citron
Peacock Feathers
Mermaid Lagoon
Seedless Preserves

Dies:
Sizzix Originals 'Shaker Box' - Square w/Window
Poppystamps 'Ragged Daisy'
Poppystamps 'Viola Leaves'
Memory Box 'Peaceful Butterfly Wings'
Memory Box 'Blissful Butterfly Border'
Memory Box 'Tall Birch'
Papertrey Ink 'Wet Paint Cuts'
Spellbinders 'Nestabilities' Rectangle
MFT 'Rectangle Peek-a-boo Window (Die-namics)

Ink:
Holtz/Distress - Walnut Stain
Tsukineko/Memento - Tuxedo Black

Other:
Stencil - The Crafter's Workshop 'Art Is'
Holtz Distress Collage Medium
Embossing Powder - Clear
Embossing Folder - Cuttlebug 'Butterflies 3x3 Tag Team Combo'


Challenges I'm Entering...

PSC #33     'Rainbow Wishes'

An entire card full of snippets 


So this card won't win any prizes and may in fact be more awful than I realise, but that's ok as it gave me time to experiment with four 'new to me' items - most of which I've had for a while now.
(I have been told on more than one occasion that I'm too hard on myself...   but as that will never, ever change we may as well all accept the fact that if I post something and think it 'sucks' - even if only a little bit - I'm just going to go right on ahead and tell you).   

*

For those of you that know me...
Life's a struggle right now and I just hurt - a lot.
So yes, I've been missing...  and yes, I'm not ok.
But I'm better than I was.
I just need a little more time., then I'll face catching up with you all - which I will, so don't bother telling me not to. x
I'm just not up to pretending right now.
But I have missed you...
and I thank those of you that know me well enough to know already that me disappearing = me going through rough times.
And you who knows but gets in touch anyway because she's worried (you know who you are) - thank you, too.
You are all far more of a blessing than you realise.

And for those of you who don't know me and have no clue as to what I'm going on about...
Let's just say that life can be very unfair and I'll leave it at that.
After all, we can all relate to that at some level or other.


And so as not to completely depress you all...
Think of something you like to do that makes you happy - and then (as long as it's safe for you/others and it's not illegal) go make time and do it this week if you can.  

Thanks for stopping by today...

Donna. x

Thursday, 27 April 2017

Office Worker Leaving Card, Shirt + Tie, Personalised

One of my husband's work colleagues is leaving next week after a fair few years of service...  considering how quickly some of them leave by comparison, in any case!

He will be missed as he's worked closely with Hubby for years, so I wanted to make a very 'individual', personalised leaving card that included some of those elements that would have been part of his daily work life.

Whether this is inspired or insane, it's currently making its way 'round the office.
They seem to like it, at least!
Want to see?


It's an 8x8 huge beastie of a card...  

8x8's use to scare the pants off me, but now I'm less intimidated by them than I used to be.
You see, I'm a fan of Sheri Gilson's work...

Sheri is a woman who seems to instinctively know what colours, patterns, textures, embellishments and layers will work together and if you look at her work you will often see 'finished' panels that stand their own ground as fully finished pieces.
She somehow knits these panels into a bigger and always perfectly balanced design that's a real feast for the eyes...  and unbeknown to me, I think her influence in making these panels is beginning to rub off a little.
I will never hold a candle to her work, but that's ok.
I'm still grateful for the inspiration...

That's not to say that I enjoy making 8x8's yet though as I often hit a 'sticking point' towards the end and lament the fact that I should have chosen a CAS design!
(Yeah, like they're so easy...  
...  That's irony - just in case you weren't sure!)

Now before I forget I should also thank Marybeth for sharing a link on her blog a while back about these dollar bill 'folding shirts'.
Of course, being in the UK meant that an actual dollar bill wouldn't work for this design, but as Hubby has a stash I 'borrowed' one for dimensions and cut some thin paper to use instead.
(...  and I've kept the dollar bill for future craft use - obviously)!


So what 'work elements' can you see on this card?
The answer should be two business cards and two spreadsheet tables of sorts.
I've torn, inked over, partially covered and even butchered down to just a teeny tiny logo in one case, then covered one with Distress Collage Medium 'Crazing', one with the same Medium in 'Vintage' and one in 'Matt'.
These 'print offs' were not on the best quality paper (hence the Collage Medium treatment) so one was spray mounted onto a second piece of paper and the other onto thin card.  
(And if you're wondering why the butchered logo got the 'Vintage' treatment it's because the colour of the business card didn't work with the rest of my design).

A stamped image of a laptop would have been perfect for this, but alas I don't have one and had to make do with the pencil pot instead.
I'm thinking I should email Mr Holtz with a plea for a 'techie' line of this style stamps.
I need a laptop stamp, you see!

So what else have I used on this card?


Supplies Used:

Dies:
Marianne Design Collectables 'Tab With Text'
Taylored Expressions 'Little Bits - Neckties'
Poppystamps 'Classic Ribbons'

Holtz/Distress Inks:
 Stormy Sky
Black Soot
Pumice Stone
Spiced Marmalade
Vintage Photo

Other Ink:
Memento/Tsukineko 'Tuxedo Black'
Ranger Perfect Medium

Embossing Folders:
Sizzix Texture Fades 'Notebook'
Spellbinders 'Fabric Weave'

Stencils:
Holtz 'Splatters'
The Crafter's Workshop 'Coffee Splotch'
Memory Box 'Texture Line Up'

Stamp:
Stampers Anonymous/Holtz 'Schoolhouse Blueprint'

Distress Collage Mediums:
Crazing
Vintage 
Matt

Other:
Staple
Paperclips
Patterned Paper


Challenges I'm Entering...

(We've Got Your Number)
The numbers might be oh so very tiny, but they are there!


(Anything Goes)


Allsorts Challenge
(Week #142 - I Spy...  'B')
'B' is for Business Card, 'B' is for Brown


Mix It Up
(Just For Fun)


Make My Monday
(Challenge #44 - Embossing: Heat or Dry)


Thank you so much for brightening my day...

Donna. x

Friday, 10 March 2017

Butterfly Clock Tag, Textured + Layered, CAS


This is an exceptionally simple, but textured/layered CAS tag, created for the new challenge starting today at Tag You're It.

I don't think you can tell from the photo, but there are two layers of glitter varnish on the base tag - sprayed on and left to dry between coats to build up that sparkle that so many of us know and love.

I have to confess, I'm not much of a glitter girl at heart, but this spray gloss varnish with added glitter had me hooked as soon as I saw it being demoed on a UK craft channel.  
It's subtle...  just the way I like it.
(And I just so happen to know that the company that make this product launched into the US market last year).


My tag was inspired by this very pretty creation by Marion Vagg...


It really is quite beautiful, isn't it?

I wanted to stay true to the beauty and the texture and the layers...  but in a simpler, more CAS form.  So I've kept the clock face (mine's die cut and embossed rather than using texture paste), swapped out the layered flower with that pretty central focus for a butterfly with a central feature and swapped out the foliage for the clock hands.  

Many, many thanks go to my oh so very lovely friend Pam who very kindly sent me this butterfly die - along with a few others to play with.  
I actually didn't know that I liked this die at all until it arrived in the post and I used it.  I'd looked at it so many times in 'die' form and discounted it as not for me.  
How wrong was I...  and how right was Pam.
It's actually turned out to be just what I needed and one of my favourites, too.
(Seems she knows my craft tastes better than I do)!
But in my defence, I am still learning...
(Don't be surprised if I still use that excuse in five or ten years time).
Shhh...  Don't tell! x


So what exactly have I used to make this tag?
Let me tell you...


Supplies Used:

Dies:
Mama Elephant 'Tags A Lot'
Lifestyle Crafts/Quickutz 'Clock'
Poppystamps 'Theo Butterfly'
Sizzix/Holtz 'Tiny Tattered Florals'

Embossing Folder:
Spellbinders SCF-002 'Fabric Weave'

Holtz Distress Inks:
Frayed Burlap
Walnut Stain

Other:
Crafter's Companion 'Spray and Sparkle' - Pearl Diamond
Raffia/Thick Paper String - White


Think of this as Part 1 of a two part post, as next time I'm planning to show you how I used this tag to create an 8x8, Clean and Layered/Mixed Media card.

And why do I want to show you?

Because I'm hoping to inspire you to play along - I'm not going to lie about it!

You see, a few of you very lovely people (you know exactly who you are)! keep telling me that you don't make tags - yet you make very lovely cards or I wouldn't stop by for a visit.
So I've decided to come up with a few ideas as of late that show how to use a tag in a slightly different way.  In other words - you've inspired me to try and think 'out of the box' - even if it's only just a little bit.
I've made a bookmark, a CAS tag on a CAS card...  and so this time the obvious choice was a CAS tag on a non CAS card.
You see, there's a perfect logic to what I've been doing!
Make a CAS tag, play along with the challenge...  and then spend time making it into a card.
Like I said, perfect logic...

(If you could see me now I would have a big grin on my face at this point)!

So if you can, come and play.
And if you can't, thank you for looking/for stopping by/for sharing your time with me.
Because either way, it's people like you who make people like me very happy to be a part of 'blogland for crafters'.    

Bye for now...

Donna. x

Thursday, 5 January 2017

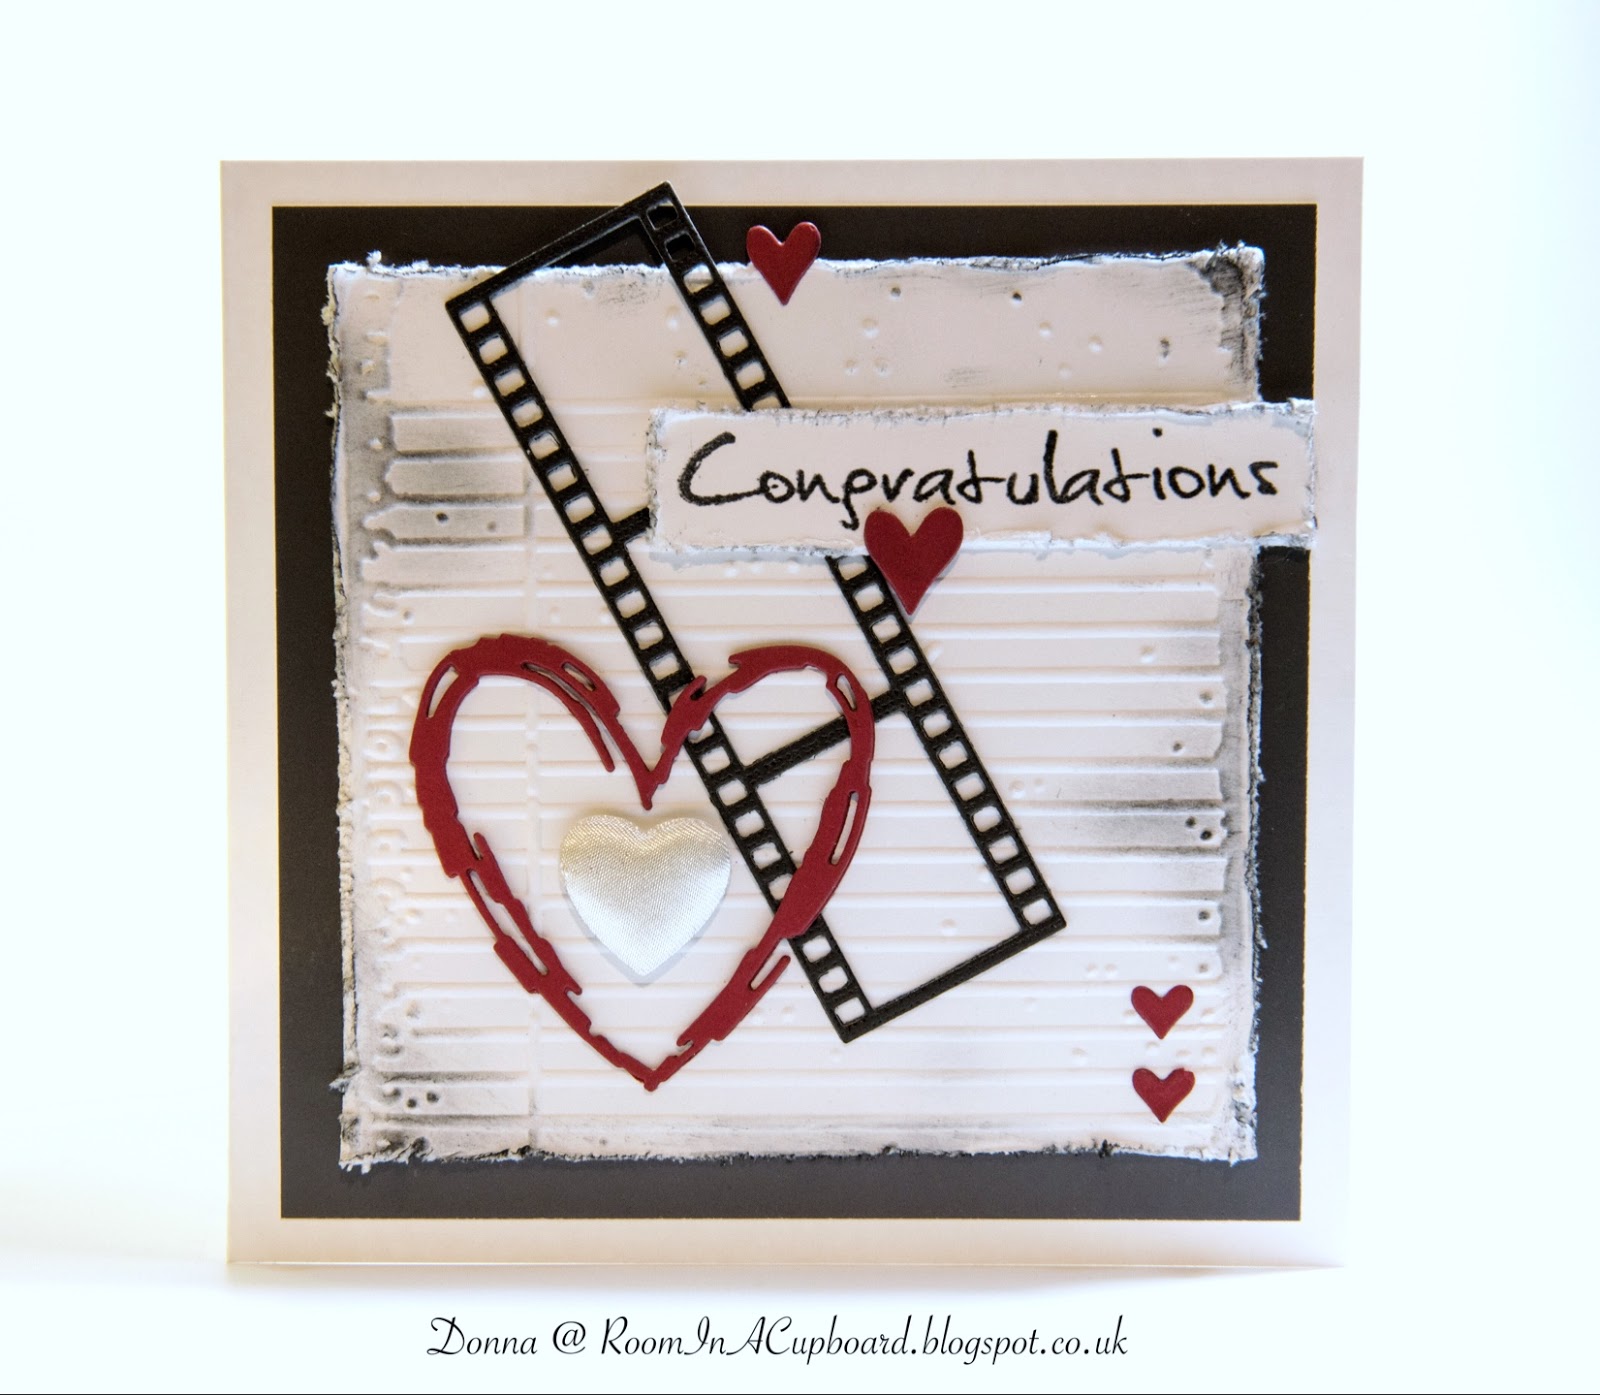
Engagement Card, Photography Enthusiast, Congratulations

I haven't posted for a while, have I?
There is a reason why, and for those of you that have been on my Facebook page today you may have already seen and clicked on the link...  so you will know.

But for those of you that may not use Facebook, you can click 'here' if you want.
At least then you'll understand why I disappear from time to time...

Anyhow...

I wasn't planning on making anything for a few days yet, but on Tuesday of this week at around midday my husband messaged me to ask if I had an engagement card to hand for one of his work colleagues.

I did not, but being a 'crafter' meant that the need to make one couldn't be dismissed - even if time constraints meant it would be dark in a matter of four hours max.

And I can't craft in the dark.

Believe me, I've tried...

Even with decent 'daylight' bulbs and lamps I can't get past the fact that I'm not seeing colours in their 'true' form.

So this was a quick 'make' for me that took about three hours - 
at least half an hour of which was used just on trying to get this card blank 'square'.
I still haven't figured out why I can't manage this feat which is why I'm not even attempting to cut and score my cards from scratch as yet - except for the odd exception when I have no choice, of course!


Here's the card...


It's not my best work, but it's ok...  especially as the main recipient was for a man and a suck at making cards for men!
(Should I 'say' that out loud?  Oh well, I just did)!

At least it's not overtly girly!

As this photograph was taken in the dark (it went straight off to work with my husband the following morning), the colours may look a little 'off', but I've messed around with the White Balance (thankfully my editing app now supports this), so hopefully you will see that you are looking at a white, black, red and grey colour combination.


Supplies Used:

Dies:
Simon Says Stamp! 'Sketch Heart'
Marianne Designs 'Filmstrip'
Memory Box 'Heart Delights'

Embossing Folder:
Sizzix Texture Fades 'Notebook'

Ink:
Tim Holtz Distress 'Black Soot'
Ranger 'Perfect Medium'
Memento/Tsukineko 'Tuxedo Black'

Embossing Powder:
WOW 'clear'

Other:
Tonic/Holtz 'Paper Distresser'
Stamp from stash
Padded fabric heart from stash


Challenges I'm Entering...

Pixies Crafty Snippets Challenge
A card made entirely from scraps/snippets


Simon Says/Wednesday
'Something New'
(Hopefully an engagement counts)!


Now that November and December are finally over with (I completely ignored Christmas just to be able to cope with it - but I did at least make a batch of last minute Christmas cards that hopefully made their way to those of you whose address I have),  I'm hoping to get back into the swing of craft making.
I haven't wasted my time away from Blogland, though...
Sometimes tidying and sorting is just as therapeutic as 'making'.


Thanks for stopping by...

Donna. x

Monday, 28 November 2016

Large Christmas Tag, 'Do Not Open Until Dec 25th', Envelopes Design

I was officially stumped choosing a design to make for Day 21 of 
This was one of those designs that go so far and then it was left for a few days whilst I pondered how to finish it.
Of course, it doesn't help when I'm making something way, way out of my comfort zone.

Take a look...


I do not like this tag at all, but I'm slowly learning that just because it's not my 'cup of tea' doesn't mean somebody else won't like it.
That's a hard lesson for me.


Here's the cute duo of tags I chose to base my tag design on.


I knew the colour scheme would stump me, but I worked with it anyway and hoped for the best!


Supplies Used:

Dies:
Mama Elephant 'Tags A Lot'
Waltzing Mouse 'Envelope'  
Waltzing Mouse 'Mini Envelope'
Spellbinders 'Deckled Rectangles'
Impression Obsession 'Fir Trees'
Memory Box 'Snow Burst'
Sizzix/Holtz 'Tattered Pinecone'

Ink:
Memento/Tsukineko  'Tuxedo Black'
Ranger Perfect Medium

Embossing Powder:
Stampendous 'Crystal'

Other:
Spectrum Noir Sparkle Pen - Clear Overlay
Star Shaped Buttons - Red
Twine - Green


I hope that today has been kind to you...

Donna. x

Tuesday, 22 November 2016

Christmas Tag, Lantern, Poinsettia

Here's my second tag for Day 1 of Tracey's 25 Days of Christmas Tags...


As you can see, this tiny tag is purely for decoration only!

In case you haven't seen my last post, my tag is based on this beauty...


(Thanks again, Pam). x


It's such a pretty tag, isn't it?

I've focused on every detail I could manage to include this time - the poinsettia, the green foliage, the candle, colour scheme, natural twine...  everything except that scribble which I've switched out for a spot of acetate embossing.

This is far more in keeping with the look of Pam's tag, isn't it?


Supplies Used:

Dies:
Sizzix/Holtz 'Hanging Lantern'
Memory Box 'Fanciful Poinsettia Ornament'
Quickutz 'Poinsettia'

Punch:
Martha Stewart 'Branch'

Embossing Folder:
Sheena Douglass 'Snowfall'

Other:
Acetate - liberated from craft packaging and saved from the fate of the bin
Spectrum Noir AquaTint Inks - Perfectly Primary
Pearl effect embellishment - red
Natural twine


Hope you have/had a good day...

Donna. x

Friday, 2 September 2016

Circular Tag, Butterfly, It's The Little Things...

It's Tag You're It Friday time again, people...
and that can only mean one thing.  A new challenge to create a tag based on the inspiration of our Featured Artist.

I hadn't made a small tag for quite a while, so I took the opportunity on this challenge to do just that.
How small is it?  Well, it's not tiny.  About 7.5cm.  That's about the size of an apple or small orange - wouldn't you say?  It's easily less than half the size of some of the tags I've made lately, but then I like that as the sentiment I've used ties in quite well.

Now, for those of you that know me... please do not adjust your monitors.  You really are looking at a black butterfly!


Yes, I know.  Pick yourselves up off the floor.

I'll show you our Featured Artist's tag and you'll soon see why I've chosen to do this...


Melissa has created such a sweet double tag, don't you think?
Pretty colours.  Dotty background.  Black focal sentiment.

I took the curve at the top and simply followed it right round - that's how I got the circle shape idea for my tag...  and I stuck quite closely to the colour scheme and also used flowers and leaves.
See how my flowers are quite dotty - like the back tag on Melissa's design?  I've even used three shades of pink!

I snuck in a bigger sentiment than the word 'smile', dropped the ribbon and made my black focal image a butterfly.  It's 'artistic license' as Melissa hasn't used one...  but my butterfly serves a secondary purpose that does still tie in.  You see, by taking a hole punch to it and threaded it on it's effectively now the smaller of two tags - making it a double tag, just like Melissa's.
(Don't you just love it when a plan comes together).

To stamp the leaves on this tag, I used the MISTI.
Why?
Because although it might not seem obvious, I've actually used two colours.
The first 'layer' was stamped using Antique Linen Distress Ink.  Then I went back over with a second layer, using a Tsukineko/Memento 'Bamboo Leaves' Marker and lightly misting before stamping.


Now before I stop to give you my list of supplies used...
How's your week been?
Me?
I've been ill in bed with a heavy cold most of the week.  My Steamer Cup, Olbas Oil and Balm Tissues have been my best friends...  and they still are as I'm only just 'on the mend' and haven't crafted all week - except for a very brief mess around with some die cuts that I may use in a future design.
So if I normally stop by and leave a comment on your blog...  I haven't forgotten you - I promise I haven't.
I'm hoping to catch up with you all over the course of this weekend...  and then maybe I can make a start on playing along with some challenges from Monday onwards.
That's my plan, anyway.  x


Supplies Used:

Die:
Memory Box 'Snow Globe' - Large

Punch:
Holtz/Sizzix Butterfly - Large

Stamps:
Penny Black 'Nature's Gifts'
Tim Holtz/Stampers Anonymous 'It's The Little Things...'

Inks:
Ranger 'Perfect Medium'
Holtz/Distress 'Picked Raspberry'
VersaCraft 'Cherry Pink'
Tsukineko/Memento 'Rose Bud'
Holtz/Distress 'Mustard Seed'
Holtz/Distress 'Antique Linen'

Marker Pen:
Tsukineko/Memento 'Bamboo Leaves'

Embossing Powder:
Ranger 'Liquid Platinum'

Other:
Twine
Flower Beads from stash
Hole Punch


Challenges I'm Entering...

Pixies Crafty Snippets Challenge
(All snippets)


(I had hoped to create something especially for this challenge, but as I've been unwell and didn't want to miss out I'm sharing my NBUS tag instead.  Both stamps used are from my NBUS collection).


Words To Craft By
W2CB #32   'A Single Step'
The journey of a thousand miles starts with a single step.  ~~ Lao-Tzu
(I think that learning to appreciate the little things in life is just as important as celebrating the big milestones...  and a journey worth taking.)


SOS #267   'Learn Something New'
(I had been watching YouTube video's where they share stamping an image lightly in Antique Linen before using watercolours - to create a no line effect.  I wanted to see what would happen using the same principal just for stamping, so did one layer of leaves in Antique Linen Ink before using a Green Marker Pen and Misting for the second layer.  Result?  Slightly mottled, gentler image than just stamping with the marker pen, and the Antique Linen does peep through in places).


Challenge #163   'Anything Goes + A Sentiment'


Challenge #130   'Not A Square'


I'm off to get a drink of water before I link up my tag to these challenges...  then I think I'm back to bed for a bit with my hot water bottle.  'Moosey' (My hot water bottle cover is a moose.  Much loved and another of my firm friends when I'm not well) will be calling for me soon, I think!

Have a lovely weekend, and take good care of yourselves...

Donna. x

Monday, 22 August 2016

Flower Tag, Vellum, Thinking Of You

Are you playing along with the current Tag You're It challenge?

If you are you will know that our Featured Artist is a lady by the name of Michelle Short.
Michelle created a tag full of colour, with one single flower that had a lot of petals!

Here's my version of Michelle's tag - made into a card so I can play along at CAS Mix Up, too.


Cards with shiny surfaces are notoriously difficult to photograph, so here's a close up shot that shows the colours in a truer light...
(If you look closely, I think you can even see some sparkle).


When I looked at Michelle's tag, I was struck by the intensity of her bright, bold colour choices.  

Let me show you so you can see for yourself...


To make this design 'me' however, I had to look past those beautifully vivid colours and see what else I could see.
A bold black outlined flower stamp with a coloured centre that draws the eye in, lots of petals, some text...  and a very pretty splodgy/dotty background.  
I can work with those, I told myself...  and set off to create my tag.  

I decided that I wanted to make something that was the 'polar opposite' to Michelle's tag, yet it still holds true to many of her design features.
I knew immediately that I only had one stamp that was similar to Michelle's.  The outline isn't as bold, but good enough for what I wanted to achieve.
Stamping the flower image onto vellum a few times - twice for the bigger flower, once for the first, (plus one bigger flower centre),  gave me my 'multitude of petals' look.  
But can you see that those petals don't really look like vellum?

Here's how I did that...

Use Black Stazon Ink and stamp image directly on to the tag.
Then...
Use Black Stazon Ink to stamp images directly onto vellum.  (Reminder: Two large flowers, one small flower, plus one large flower centre).
Flip vellum over so the stamped images are on the back, tape down (otherwise the vellum will curl like crazy) and apply a few thin layers of White Gesso
Leave to dry.
Then...
Cut out one big flower.
Do the same again, only this time leave out a few petals at random intervals whilst cutting.
Cut out the large flower centre and the smaller flower.
Using a Red Marker Pen, carefully colour all of the centres of the flowers.
Leave to dry.

BEFORE assembling the flowers...  
Colour the flower stem with Green Marker Pens, add splatters of Twinkling H20's to the tag (not a colour lift like Michelle's design, but it still gives a splodgy look - even if mine's much more sparse)...  and add an embossed sentiment.  (I stamped mine in Black Stazon Ink again, but before inking up in Black I inked up in Perfect Medium embossing Ink first.  Just stamp the text as normal, then add a clear embossing powder, shake off the excess and heat set. 

Now to assemble the flowers...
Put a small dot of glue behind the centre of the small flower, align with the stamped image on the tag and glue into place.
Do the same with the large flower, then layer on the flower with partial petals, followed by the flower centre.
Leave to dry, then shape petals on the large flower using the side of a thin paintbrush to curl around.
Mask off both flowers from the rest of the tag by placing scrap paper under the petals.  Make sure that the tag is completely covered by scrap paper and that only the flowers are showing.
Then...
Spray with Glitter Varnish and leave to dry.
(Not only does the Glitter Varnish leave a beautiful finish to the petals, it also acts as a sealant for the water soluble Marker Pen that were used for the flower centres).

Once the main body of the tag was done, I added a ring link.  This was made by gluing three layers of the die cut together (see Supplies Used for the die used), and then adding a layer of Crackle Accents to both sides and allowing to dry.  
Once dry, the link was thread through a Chain die that was treated to a layer of Silver Gilding Wax.  (I had to cut the link to do this, then glued it back together with a spot of Collall Tacky Glue).

All that was left to do was to make a quick background.
I used an Embossing Folder on a piece of Kraft Core Metallic card, sanded it to see some of the core beneath...
...  and then glued everything into place - using 3D Gel to add dimension underneath the tag.
Then I mounted the whole thing onto silver card stock for colour continuity.

It's not as complicated as it all sounds - I promise!
I'm just a very 'wordy' person!


 Why don't you come and join in with us at Tag You're It!?
The current challenge started on Friday so there's plenty of time to play along.
We'd love to see you there. x


Supplies Used:

Stamp:
Uniko 'Pure Florals' - Cosmos

Dies:
Mama Elephant 'Tags A Lot'
Poppystamps 'Delicate Chain'
Poppystamps 'Righteous Rings'

Ink:
Stazon 'Jet Black'
Ranger 'Perfect Medium Embossing Ink'

Marker Pens:
Stampin' Up 'Raspberry Ripple'
Stampin' Up 'Gumball Green'
Tsukineko/Memento 'Bamboo Leaves'

Embossing Folder:
Sizzix/Tim Holtz Texture Fades 'Distressed Frame' 

Other:
Twinkling H20's  - Pearl Blue
Pebeo Gilding Wax - Silver
Tim Holtz Kraft Core - Metallic
Stampendous - Clear Embossing Powder
Collall - 3D Gel Glue
Crafters Companion 'Spray and Sparkle' - Pearl Diamond


Challenges I'm Entering...

CAS Mix Up Challenge
(I chose Stamping, Spray Varnish, Markers and Twinkling H20's 'Splatting')


Simon Says/Wednesday
Make For The Border


Pixies Crafty Snippets Challenge
(The whole tag's made from snippets)!


I hope you had a good weekend and are ready for whatever today brings your way...

'Crafty Hugs' to you...

Donna. x


*


I went out early this morning and came home to be greeted by some lovely Happy Mail...  
My first Pocket Letter from my very lovely craft friend, Hazel Kingvig-Paul.
Thank you so much, Hazel.
You sure did brighten my day.

I couldn't quite fit it all into the one photo, though...


Isn't it amazing?
So much thought and attention to detail...
...  And what a lovely way to use up some of those odds and ends that I know we all have.

Sending you a very big thank you 'hug', Hazel. 
Mwah. x