Friday, 10 February 2017

Bird/Heart Tag Card, Missing You, Muted Colour Palette

I have noticed that many in Blogland are suffering from what I'm going to refer to as 'Lost Mojo-Itus'.
It does seem to be reaching pandemic proportions, doesn't it?
I think that the cold and a lack of sunlight affect many of us far more than we realise.

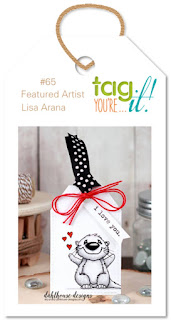
So with that in mind, perhaps my tag card for today's new Tag You're It challenge is paying homage to what so many of us seem to be missing...


It's a simple offering that shows just how easy it can be to make a tag into a card.

A bird stamped on vellum, some sparkle from the ink used (and a pen) plus a tiny gem and clear embossed sentiment just give this a little something extra to add visual interest whilst still keeping to a clean look.

Where did my inspiration come from?
Let me show you...


I was inspired by the colour scheme but wanted softer, gentler colour tones for my design.  As you can see, I also stuck with the heart and animal theme but swapped out the cute critter for a bird.
And for those of you who haven't seen it (inspiration can be a funny thing like that.  For some it's obvious, yet for others it's anything but) Lisa's 'tag on a tag' has become a 'tag on a card'.


Supplies Used:

Die:
Paper Smooches 'Gift Tags'
Memory Box 'Heart Delights'

Stencil:
Creative Expressions 'Birch Tree'

Stamp:
Inkadinkado 'Luv Ya'

Inks:
Holtz/Distress 'Pumice Stone'
Brilliance 'Starlite Black'
Tsukineko/Memento 'Gray Flannel'
Ranger 'Perfect Medium'

Other:
Spectrum Noir Sparkle Pen - Clear Overlay
Vellum
Emboosing Powder - Clear
Raffia - White
Tiny Gem - Clear
Sentiment stamp from stash


Challenges I'm Entering...

(I Heart You)


(Tag, hearts and vellum bird all from Snippets)


(Inspired By Words...  Friends are connected heart to heart, distance and time can't break them apart').


(Young at Heart)


(Challenge #39    'Shimmer and  Shine')


Wherever they may be hiding, I hope that Mo and Jo come back soon for those of you who can't seem to find them! 

Stay warm...

Donna. x

Tuesday, 7 February 2017

The Unfolding (Penny Black), Easel Backed Card, Acetate Layer

I'm showing you something very different for me today.
Do you want to see it?
Well, here goes nothing...


That's a lot of colour for lil' old me, isn't it?
Did you think you'd gone to somebody else's blog by mistake?

Here's the card from a different angle...


And just look at what I've done with the back...


I stumbled across this 'find' (Sizzix/Holtz 'Small Easel') and just knew that I had to have one...  and I plan to have a lot of fun using it this year - just so you know!


Now...  if you were on FB yesterday you may have noticed just how 'over the top' happy I was to find out that Penny Black had released some more Brushstroke stamps to their range.
When I tell you that this was my first ever go with a Brushstroke stamp you'll understand why I was so elated.
You do understand, don't you?

I mean seriously, I am not a stamper and I know that this card isn't perfect...
but when my husband saw it for the first time he thought I'd painted it!
(I wish.  I'm no artist, either)!

Now if this style of stamp can make me look far more talented than I actually am then it's a no-brainer for me.  
More Penny Black Brushstroke stamps coming my way.  And they are natured themed to boot.
Woo hoo!!!
(You did cotton on to the fact that virtually everything I make is nature themed, didn't you)?


So that's me very, very happy...
And I may as well spend my pennies on that, hadn't I?


As I'm not sure about just how much detail you can actually see in the photo, I'll do a very brief 'How To'...

Stamp image using MISTI (or similar).
Ink around edges.
Cover flower stamped image with scrap paper, then wet hands and 'clap' over inked edges.
Blot to dry and 'lift' some ink.
When dry, use a score board and 'draw on' some random, broken lines.
Cut a piece of acetate to size, emboss it and attach with screw brads.
Cut a bigger piece of brown card to size, emboss it, then add some gilding wax.
Glue acetate fronted image to card back.
Cut a larger green piece of card to size, slightly sand it and distress the edges.
Cut a slightly larger white piece of card to size and distress the edges.
Glue all layers into place.
Add cut, glued and stacked word die cuts.


Now I glued several pieces of card together to create a sturdy base for all of this - which is why I needed to use the easel.


Supplies Used:

Stamp:
Penny Black 'The Unfolding'

Tsukineko/Memento Inks:
Lady Bug
Rich Cocoa
Bamboo Leaves
Pistachio
Stormy Sky
Broken China

Embossing Folders:
Sheena Douglass 'Snowfall'
Sizzix/Holtz Texture Fades 'Woodgrain'

Dies:
Memory Box (Sketchbook) 'Create Art'
Sizzix/Holtz 'Small Easel'

Other:
Pebeo Giling Wax -  Silver
Screw Brads
Acetate


Challenges I'm Entering...

(Your Favourite Flower and Why)
My favourite flower is the Magnolia - a stunningly beautiful flower.  Mine flowers right on the cusp of Spring...  which makes me happy as I hate Winter!!!


(Use Your Favourite Stamp)


(Try Something New)


I may look super duper inactive online right now, but I have been busy beavering away.
Honestly I have!

Have a good week...

...  and thanks for stopping by...

Donna. x