Friday, 30 September 2016

Some Bunny Loves You Tag, Acetate Layer, Rabbit

I'm sure you've noticed that some stamps have a sentiment that just pairs with them so absolutely perfectly that they look like they were always meant to be together.
 You have noticed that, haven't you?
My tag for today's new Tag You're It challenge just so happens to be one of those pairings.  
I don't often do 'cute' images, but I just couldn't resist this sweet little bunny - it's so adorable :)
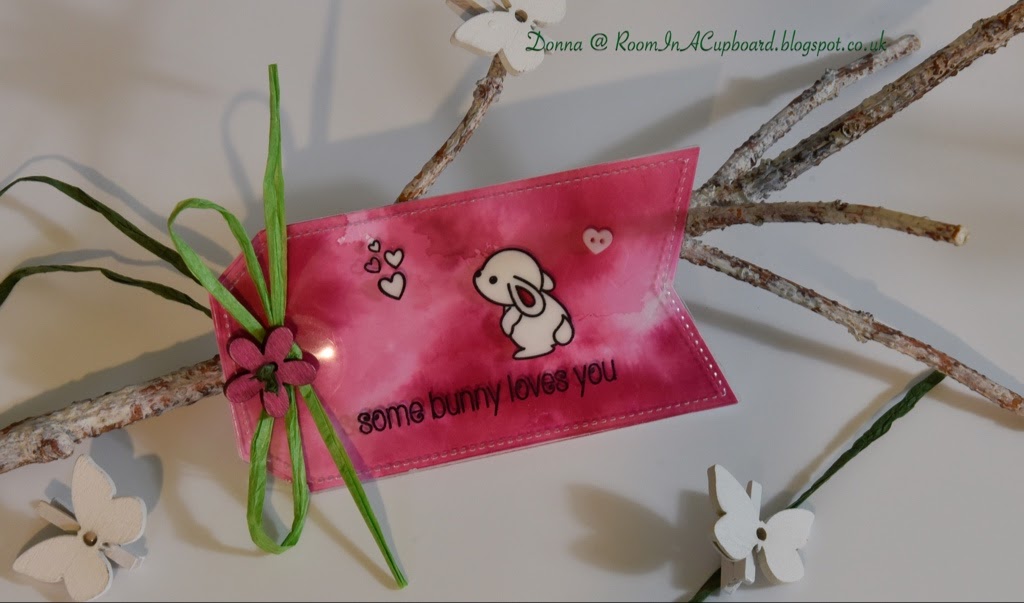


Here are two close up shots.  Isn't bunny just the sweetest thing? 


...  and if you look really closely at the last image you will hopefully notice my subtle embossing :) 


 Now at first glance I will admit that this tag of mine looks like it has nothing in common with our Featured Artist's inspiration tag for this challenge.
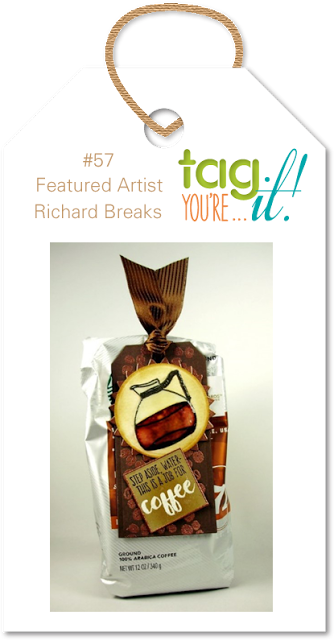


However, if you look you'll see that not only do Richard Breaks stamp and sentiment pair perfectly;  he's also only really used the one main colour - variations of brown with a few complimentary colours thrown in (artistically, of course)!   And he's also embossed his background.

Now I may not have used brown, or coffee, or gone for a heavy embossed look...  but I have included those key features in my own unique way :)

(This bunny sure does make me smile, have you noticed)? 

Now I don't know what you normally colour your images in with if you are using acetate, but I had a 'eureka' moment by accident whilst experimenting with this design.
You see initially, I wasn't sure if I was going to stamp in black or white, so I got out both of my Stazon Ink pads for a quick practice on scrap acetate packaging.
I had never used my Cotton White ink pad before and it did not go well...  and I followed the instructions on the packaging three times over!  
So being suitably unimpressed, and resigning myself to the fact that this was a bad purchase on my part that would have to be binned, I put this to one side and stamped with my black Stazon instead.

But then I got to thinking (it happens occasionally)!
What if rather than throw the ink pad away (if you know anything about this ink pad you will know that it comes as a dry pad with a separate bottle of ink that you apply yourself), I used the Inker bottle ink to paint with?  'Eureka' indeed!

So I applied two coats of ink to the back of the stamped images (with drying time in between), added a touch of 3D Gel Glue behind the bunny and then sandwiched the two tags together.  Then it was simply a case of adding a few bright and colourful embellishments...  and job done :)


(If you missed my post the other day you may be wondering how I achieved the deep pink look to my tag.  It was super easy as all I had to do was use some Crafter's Companion/Spectrum Noir Aqua Tint Ink.  Just wet your paper and splodge it on.  It really is that simple).

I hope my little bunny tag made you smile today, too :)
Why don't you have a go and see what design you can come up with?  Whether it's coffee or not or brown or not, my team mates and I would love to see you give it a try.  
So come and join us at Tag You're It :) 


Supplies Used:

Die:
Mamaelephant 'Tags A Lot'

Stamp:
Clearly Besotted 'Woodland Kisses'

Inks:
Stazon 'Jet Black'
Stazon 'Cotton White'

Other:
Crafter's Companion/Spectrum Noir 'Aqua Tint Inks' - Perfectly Primary
Acetate
Wooden Button
Micro Button - Heart Shaped
Green Raffia - Two shades of Green
3D Glue Gel


Challenges I'm Entering...

Anything Goes


W2CB#33   'Every Child Deserves A Champion'
(...  and what better way to champion your child than to remind them that they are loved)?


Challenge #18 - I chose Stencil, 3D Project, Back To School
(Can you imagine this in a school lunch box - maybe with a lollipop tied around it - just to remind your child that they are loved)?


Challenge #165   'Anything Goes'


Out of interest, have any of you also had failings with the Cotton White Stazon ink pad or am I just uniquely blessed in that department?
Don't laugh...  I'm uniquely blessed in lots of ways!

Have a warm, safe and peaceful weekend...  and if you can't have all three, be safe at least.

Big hugs to you for stopping by today...

Donna. x

Wednesday, 28 September 2016

Corrugated Bird On A Branch, Christmas, Kraft Card

Some of you will know that I've started using my husband's photography equipment for my blog photo's...  which means I'm on a bit of a learning curve to say the least.
What doesn't help however, is when this card was all finished up, photo's were taken on Saturday morning for me to edit, I say to my husband that they look blurry, he says no they don't...  and so I edit them anyway.   And then I show him and he agrees with me that they look blurry!
I mean, seriously?
Do you have any idea just how long it takes me to edit?!!

So there's been a three day delay getting this card online (he went away the following morning for two days with his beloved camera)...  and truth be told it still kind of looks a bit blurry to me - even though I took a new batch of photo's and edited them just yesterday.  But this card is heavy on texture and glitter spray and camera's don't seem to like that shine so much.
Oh well...


Do any of you Memory Box fans remember the Twigs and Berries die set?  If you do, you'll probably see straight away that's where I got my inspiration from for this months Memory Box 'Stencils' Challenge.

Take a look...


Here's a close up shot.  See what I mean about lots of glitter spray?


This card was such fun to make.

I've used three different Memory Box stencils (two current and one discontinued, but truth be told the discontinued one looks a lot like paint splatters anyway so it's easy to swap out if it's not in your stash).  Then I've cut out some circles, added a bird that I've made from corrugated card and covered in texture paste (the wing's from a Poinsettia die), added extra branches, lots of glitter spray, some berries (red enamel dots), torn paper edges, white acrylic paint...  and then basically I've just sandwiched the whole thing on to an embossed background that's been lightly Gessoed first (using watered down Gesso) with some 3D glue gel.  

It's a very 'me' style card...  kind of pretty but messy looking!
Speaking of 'me'...  When I told my husband that this was a 'me' style card, he said,  'I'm not surprised.  If you were a colour you would be brown'.
Brown with green accents, I think.  But I was very surprised by his astute observation...  Which leads me to ask the same of you.
If you were a colour, what colour would you be?
Get's you thinking, doesn't it?


Supplies Used:

Stencils:
Memory Box 'Leafy Stems'
Memory Box 'Sprinkle Dots'
Memory Box 'Splatter Spray'

Dies:
Memory Box 'Elodee Bird Background'
Poppystamps 'Small Luxe Poinsettia Background'
Memory Box 'Woodland Branch'
Memory Box 'Grove Branch'
Circle dies - I used MFT and Spellbinders, but any small ones will do.

Inks:
Tim Holtz/Distress 'Peeled Paint'
Tim Holtz/Distress 'Bundled Sage'
Tim Holtz/Distress 'Forest Moss'
Tim Holtz/Distress 'Frayed Burlap'
Tim Holtz/Distress 'Walnut Stain'
Tim Holtz/Distress 'Gathered Twigs'
Tim Holtz/Distress 'Black Soot'
VersaMagic 'Cloud White'

Other:
Texture Paste - White
Acrylic Paint - White
Enamel Dots - Red
Crafter's Companion 'Spray and Sparkle' - Pearl Diamond


Challenges I'm Entering...

Branch die cuts, bird and snow banks made from snippets)


Christmas In September


Challenge #31    'No Patterned Paper'


Add a Bird and/or Colours


Challenge #42    'Anything Goes'


If you've been kind enough to stop by twice in one day (once for this post and once for the last post), then thank you so very, very much.  Your kindness means a lot to me.

Take good care of yourselves...  and don't forget to answer my question - if you can!

Donna. x


Ornamental Tag On A Bag, Christmas, Joy

Do you ever get weeks when you feel like you're chasing your tail and still not getting anywhere?
If so, I know exactly how you feel as craft wise, it's been a long hard slog this month!
Let's just say that more and more I'm beginning to realise the merits of CAS designs. 

...  Of course, this makes me think of dogs.  They have this thing about chasing their tails, don't they?


Anyhow...


I have a fairly simple offering to share with you today.  It's taken many detours and caused me many a headache...  until I eventually figured out that sometimes simple is best.


  It's been made specifically to play along with the latest Poppystamps challenge that's due to end today.

I've included a few close up shots so you can get a better look at the tag...


The challenge over at Poppystamps for this month has been to emboss, deboss or heat emboss.  I went with heat embossing and finally had my first playtime with my Stampendous Frantage Kit (which is what is covering the main body of my tag).  I basically chucked on a bit of everything so I'm quite pleased how the glitter particles have spread themselves out so nicely.  Not so pleased about that odd bit of whatever it is up in the top right corner, though.
At least it looks less out of place in reality.  Photo's can be very unforgiving, you know!


There's not too much to say about how this was put together.  As well as heat embossing the main body of the tag (and the clasp and peg) I've layered up the snowflakes at different heights, also added layers to the main body of the tag and clasp for extra durability, sprinkled on some glitter from the Frantage Kit for one of the smaller snowflakes and added on a sequin, gem and tiny pearl...  as well as adding the main snowflake embellishment to the centre of the whole thing, of course.
Then it was simply a case of making a quick bag from a sheet of ink splodged A4 watercolour paper, adding the JOY embellishment at the bottom, tying on some glittery twine...  et voila.
It's easy when you know how, isn't it?

...  And yes, I do know that technically the front of my tag is the back and vice versa.  But when's a little thing like that going to stop me?!


Supplies Used:

Dies:
Poppystamps 'Lavinia Snowflake Ornament'
Poppystamps 'Costello Ornament Background'
Memory Box 'Alphabet Tile Letters'

Punch Board:
We R Memory Keepers Gift Bag Punch Board

Embossing Powders:
Stampendous 'Frantage Encrusted Jewel Kit' - White
Ranger 'Liquid Platinum'

Other:
Crafter's Companion/Spectrum Noir 'AquaTint Inks - Perfectly Primary
Silver twine
Snowflake Embellishment
Sequin
Gem
Pearl
Raffia - White
Craft Peg


Challenges I'm Entering...

Powder Power


Gift It


Christmas In September


Challenge #31   'No Patterned Paper'


I'll be back later on today with another post...  and then again on Friday!

See you, then...  if you have the time, of course :)

Donna. x