Showing posts with label Die-namics. Show all posts

Wednesday, 23 August 2017

(Poppystamps) Scribble Flower Circle, Hope, Polka Dots

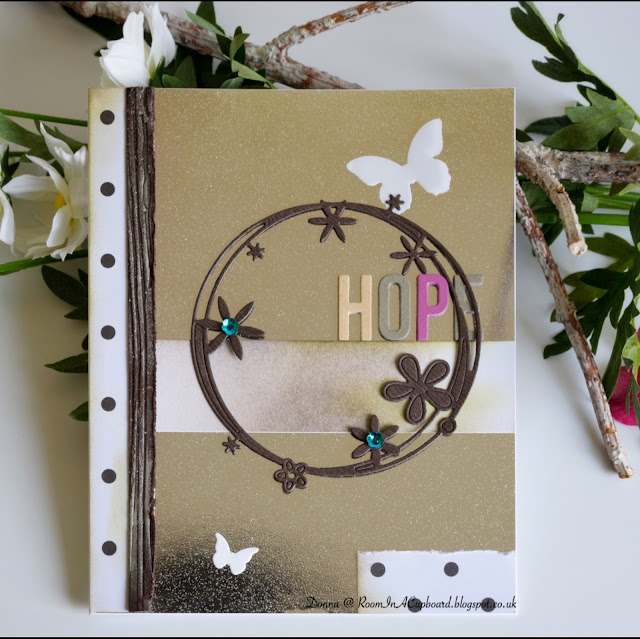
This is a simple offering of a 'very difficult to take a decent photo of' type of card...  but I'm not apologising as I love the effect!

But be honest...  can you tell that this is a card made entirely out of discarded bits and pieces from old projects?   I decided it was time to 'tackle that mountain' and put at least some of them to use!


*

I've added two close up shots...


*


And my first go at a photo breakdown of how this card was made...


Spraying this Crafter's Companion 'Spray and Sparkle'- Iridescent' gives a lovely mottled effect.  And if it's a 'less than pristine' piece of card it helps disguise those tiny scratches and fingermarks.  
That's a win in my book!


Here's a photo breakdown of the supplies I used. 
That scrap of wood effect card was embossed  (Crafter's Companion - Woodgrain Embossing Folder), then treated to a gilding wax polish before layering on that scrap of leftover spotty, dotty paper.  
The piece in the middle?  Left over from my Deer Frame project.  But I knew which inks I had used so they are included in this photo.
Plus a tiny scrap of spottiness in the corner - just because I can!
I did smoosh on some green inks to help give a more distressed look - and yes, I did succumb to using my distress tool just a little bit on that wood effect piece of card as well as the tiny piece in the corner.


Next I added the word HOPE from these two 'My Favourite Things' dies (Die-namics 'Happy Greetings' set.
Each letter was layered up four times for lots of dimension.


Then add one very lovely 'Poppystamps - Scribble Flower Circle'.
Notice how I haven't removed all of those tiny bits and pieces that you're supposed to poke out?
My circle die cut is from the 'Altenew - Woodgrain Bark' set of papers that they sell.  Mine were a blog win prize that I only had to pay the p&p for - which made them an affordable option.  But if I didn't have these papers and wanted to replicate this card any woodgrain embossing folder would do.
Then I simply added two tiny sequins...


The final step was the addition of these two butterflies.
The tiny one's cut from white card (Memory Box - Peaceful Butterfly Wings) and the larger has been cut from vellum using the 'Memory Box - Blissful Butterfly Border' die.
The only glue holding the vellum butterfly in place is a small smidge directly underneath that brown flower from the Poppystamps die.  Doing it this way gives just a tiny hint of added dimension as well as being a way to hide the glue on the vellum from view.


So what do you think?

Do you prefer my photo style explanation over the write up?

If you have the time, I would love to know.


This card doesn't actually use any Poppystamps border dies (and yes, I do have a lovely set of them), but I still think it fits the theme of this months challenge.
Homemade, scrappy borders can be just as effective if you pair them up with a beautiful die.

Well, that's what I think anyway!


*


Challenges I'm Entering...

PSC #35


Only Cards Challenge


Challenge #79  -  Anything Goes using Dies


#317  -  Wood Is Good


*

Thanks for stopping by today...

Donna. x
Sunday, 28 May 2017

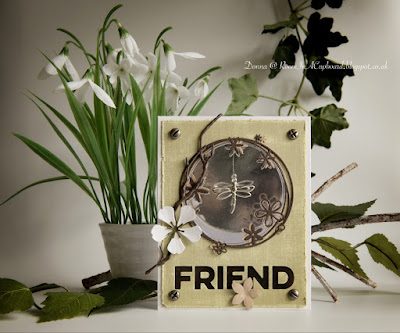
Dragonfly Charm Card, Scribble Flower Circle, Friend

I haven't made a card like this for a while now...  


It reminds me of the stuff I started out making - not sure if that's a good or a bad thing really, but it does include lots of my favourites...
Dies, acetate, Mirri card, screw brads, dangling things hanging from invisible thread, sanding and distressed edges...  I could go on but I'm sure you get the idea!

The main difference with this card is that I've since discovered Spray Adhesive - which means no more trying to marry up dies on the back of the acetate as the spray adhesive leaves behind a shimmer that looks good enough to leave well alone.

Here's a picture of the card lying flat... 


I did spend an age describing in detail how this card was made, but for some reason or other the blog went on the fritz and everything froze - so l've lost over an hours worth of work today. 
So I'm sorry, but I can't type all of that up again...  not with sore hands/wrists that still need time to heal.
Wonder if it's just the joys of old age?


Supplies Used:

Dies:
MFT 'Friend'
Poppystamps 'Scribble Flower Circle'
Memory Box 'Fabulous Phlox'
Memory Box Woodland Branch'
Spellbinders 'Nestabilities' - Circles

Punch:
Flower Punch from stash

Other:
Dragonfly Charm
Screw Brads
Acetate
Invisible Thread


Challenges I'm Entering...

Challenge #32   'Flower Power'

All snippets except the Core'dinations...


As always, thank you so much for stopping by today...

Donna. x

Tuesday, 23 May 2017

Threaded Butterfly Buttons, Scribble Flower Circle, Friend

Apologies again to those of you who I haven't caught up with as yet.  Sore wrists and knuckles (RSI)? meant that I've had to take things easy for a while - as well as thinking about ways to do things differently.
 The best thing I've found to help me has been my trusted old hot water bottle with very hot water inside it - but I love intense heat anyway so that may or may not work for you if you ever find yourself in a similar position.

Guess I just have to learn to moderate my keyboard and iPad usage for a while longer as I still get the odd niggle...  but at least it doesn't seem to have affected my crafting!

So a short post today as I've already overdone myself a bit on editing a batch of photo's.

This was a quick and easy card to make...


...  and it will be' winging its way' to a very lovely craft friend of mine who is currently away on holiday.  I just wanted her to have something fun and cheerful to come back to after her time away.


So how's it made?

Cut out one Poppystamps 'Scribble Flower Circle' and disassemble the pieces - but don't throw anything away as yet!
Spray the back of the outer circle part of the die cut with Crafter's Companion 'Stick & Spray' 
(a Temporary Repositionable Adhesive), then attach to a piece of card stock.
Using a Finger Dauber (or any other Sponge Foam Applicator that you have to hand) add Holtz/Distress 'Frayed Burlap' ink over the die cut.  Keep a light touch - you don't want to add too much ink!
Remove the die cut.
Now add the inner part of the Scribble Flower Circle to the card base - at a diagonal angle.  (I've actually layered up three die cuts here for added dimension, but it's a personal choice that shouldn't effect the overall design too much if you choose not to do the same).
Now rummage through those bits I said not to throw away yet and find the small curved triangle that completes the biggest of the six petalled flowers - and glue it into place.  (Once again, mine's layered up to match the depth of the three layers I've already used).
Cut out one of each of the Poppystamps Butterfly Buttons from your scraps collection/offcuts of card.
Decide on the placement of your butterflies, then thread the Butterfly Buttons through the string and glue into place - adding Crackle Accents once dry.
Leave to dry again...
Then cut the card stock to size, being sure to leave room top and bottom to add a complimentary strip of coloured card that you attach from the back.
Glue the whole thing to a card base.
Die cut one more Scribble Flower Circle from a complimentary shade of white colour card stock,  carefully cut out the flowers and place as shown above.   Then trim off the excess.
Add one die cut butterfly from Memory Box 'Peaceful Butterfly Wings', three Morning Dew Drops...  and that's it...  except for adding the MFT 'Friends' die that I've cut twice (using two different colours) to add a drop shadow effect.
As I said, an easy card! 

For those of you who are wondering, I used Altenew's 'Woodgrain Bark' card stock for this design...   and in a 'not too far into the future' post you'll see how I used the other part of this die cut to create a very different looking card indeed. 


I'm entering this card into the latest Poppystamps challenge...


Challenge #32   'Flower Power'

(An all scraps/snippets/offcuts card - even the large piece of white card stock used to attach everything to is an offcut).


Thanks so much for stopping by today...

Donna. x

Saturday, 8 April 2017

Branch Of Grace (Penny Black), Photo Album Style Card, Imagine

I'm trying out an idea today...

You see, I've decided that I love quite a few of the Penny Black flower stamp sets that are around - which means that I've got to try and find a way to make them 'work' for me.

By 'work', I mean I'm trying to fit them into a style that's all of my own...  which is very, very, very hard when you see just how many talented people out there in blogland have already posted such amazing versions/designs and layouts of the stamps I like.

It's also hard because I quite genuinely admire their design flair and the way they've paired things up.

So it's a challenge...  and one I'll be working on this year as, as much as I love my dies I want to broaden my horizons a little.

So I'm posting this one a little apprehensively.  It's a style of card I've also never tried out before.  And if this style has a name, I haven't a clue what it is!

So here goes...


The main issue I had with this is that I wanted something that wouldn't detract from the stamped branch (which I really love, by the way), yet I didn't want it to look too bare and 'unfinished' either.
And I have to confess, I only added the strip going from left to right as I was writing this post up.


You know when you're working on a design and you just know that it's not quite right but can't seem to put your finger on it?
Do you?
Please tell me that happens to you, too?
Pretty please?

Let's just say that I'm glad the 'penny finally dropped' (I think it quite genuinely got stuck!) as now the design looks better than it did.

 I've realised that I don't really have an awful lot of self confidence when it comes to trying out new ideas, but I am very blessed and oh so very, very talented when it comes to being critical of my craft 'work'.
(Hands up if you can relate to that.  And if you can't I'm genuinely quite jealous).


But before I give a quick 'how to' of how this card was made, let me fill you in on March - where very little happened craft wise...


You see, Husband has this thing where he brings home the germs from work and gives them to me to make me sick.
(He likes to share, you see)...

So He caught a cold at work (where they were all snotty and sneezing) and then passed it on to me.
(Both of our colds lasted for about a week.  On my worst day I had to eat with sunglasses on as my eyes were streaming and couldn't tolerate light.  I also slept with my Winter hat and scarf on for most of that week)!
Then I get better for a day or two before He has to work through the weekend (on top of his usual working week) for a show at the NEC  (a work exhibition four day extravaganza where you're not even allowed to sit down) - which meant extra house chores for me as He was coming home later than normal - and He was understandably very tired.
Then He gets sick again within a day of the show finishing  (He actually came home from work early)...  and this time I'm on Nurse Duty as He's confined to the bedroom (my attempt to quarantine Him).
And just as He's well enough to come out of quarantine (He had to go a full day of NO sneezing at all - which took five or six days,) who got ill again?
Yep.  Little Old Me...  For another week!

So barely any craft time...  but plenty of time to craft shop online.

That's the price He pays for making me sick!!!

And then two days later the boiler broke.  And it's still broken to date.  And the house is so cold with no heating.
And I don't do 'being cold'...


So that's why I've been so quiet - even for me.


Oh yes.  There's just one other thing (and I know I've mentioned it before) but maybe I should mention it every time - I don't know?!!

You're not looking at a black card base.
It's a very, very dark shade of brown that I just love to use, but I know that a lot of you perceive this as black on your monitor screens and I often forget to say as I know what colour it is!

...  And more one thing...

If this design is 'pants' please be gentle with me when you tell me.  But please tell me.
I'm having a rough year and although things are getting easier in some ways they really aren't in others.
Sometime's it's just too hard...


Supplies Used:

Stamp:
Penny Black 'Branch of Grace'

Dies:
MFT Die-namics 'Flutter of Butterflies' - Lace
MFT Die-namics 'Photo Corners'
Memory Box 'Sketchbook Imagine'

Punch:
Martha Stewart Pop Up Butterfly Border

Memento Inks:
Gray Flannel
Rose Bud

Holtz/Distress Inks:
Tumbled Glass
Broken China
Seedless Preserves

Embossing Folder:
Crafter's Companion/Textures 'Wood Grain'

Other:
Ranger Perfect Medium
Wow Clear Embossing Powder
Pebeo Gilding Wax - Silver


Challenges I'm Entering...

Pixie's Crafty Snippets Workshop
(All snippets except the base card).


(Foliage and Flowers)


Penny Black and More Challenge
(April Challenge - Spring)


(Spring or Easter)
(Anything Goes)


NBUS 
(Challenge #11)


(Challenge #132  -  Spring)


(Challenge #345  -  Flowers)


I've also moved my photo set up today as it just wasn't getting enough natural light.
I now have room for two light sources (if needed), as well as a 'rig' for bouncing a silver/gold sheet off.
It's not a professional set up, but 'make shift' works for me...
and with the expense of a new boiler I have to be a good girl for a while!

Enjoy the sunshine if you're lucky enough to have any today...

Donna. x

Monday, 28 November 2016

Christmas Tag, Mini Snow Globe, Deer

I've opted to make a tag for a child for Day 25 of


Here it is...


My idea came from seeing this tag (below) with the cute image inside the snow globe.
Did you notice that I had a snow globe mounted on my star shaped tag? 
My husband didn't! 


Supplies Used:

Dies:
MFT/Die-namics 'Stitched Star STAX'
Memory Box 'Small Snow Globe' 
Open Studio 'Snow Globe Bases'
Marianne Design/Craftables 'Tiny's Pine Trees'
Impression Obsession 'Wreath'

Stamp:
Stampin' Up 'Forest Friends'

Memento/Tsukineko Marker Pens:
Gray Flannel
Tuxedo Black
Bamboo Leaves
New Sprout

Other:
Crafter's Companion 'Spray and Shine' Varnish
Twine - Gray
Gems - Pink


Although Tracey's challenge clearly states 25 Days, she snuck in an extra day!
So that's one more tag for me to show you on my next post...

Just one more tag to go...

Donna. x

Christmas Tag, Star STAX, Pink

I've had another go at playing with layers for Day 24 of


I hope you like this one...


I took my inspiration from this tag (below).  


As you can hopefully see, the star shape is what I chose to use as my design focus...  although I did also get in plenty of sparkle and shine  :)


Supplies Used:

Dies:
Memory Box 'Distressed Tag'
MFT/Die-namics 'Sitched Star STAX'

Embossing Folder:
Darice 'Snowflake'

Other:
Twine
Silver Cord
Dew Drops - Blue
Crafter's Companion 'Spray and Sparkle' - Pearl Diamond


Hope you enjoy/enjoyed your day...

Donna. x

Friday, 13 May 2016

Torn Tag, Butterfly, Female

I'm using something a little bit different for today's Tag You're It DT challenge tag - gorgeous natural looking Spider Web.  I hadn't come across this type before and I've got to say...  I absolutely LOVE it.


My tag takes it's inspiration from the very lovely Jeanne Jachna (see below). 


An off the edge butterfly, lots of flowers, some script text and dots, patterned paper, fishtail flags, three gems, twine...  and a strip running across the middle.  Can you see the script and dots on my tag?   And the flags?
No?
Well, in fairness to your eyesight that was a bit of a trick question...
The dots are acknowledged on the butterfly die I chose to use (see the round holes?), the script (my background) is actually from an old Lili of the Valley script stamp...  and the fishtail flags have morphed into leaves.
Oh yes...  and I didn't forget about the embossing...  I just substituted for a bit of texture paste :)

Now you might be wondering why on earth I tore the edges off those corners like that.
In truth, it was a last minute decision...
You see, Jeanne is super talented when it comes to layering up lots of pretty bits of paper...  and I am not.  So to give the illusion of more layers than there really are I opted for a bit of paper tearing.  
It also lends itself a little better to CAS with some white showing - it's a linen texture backing tag, but I'm not sure that shows up in the photo.


Supplies Used:

Dies:
Die-namics 'Flutter of Butterflies - Lace'
Elizabeth Crafts 'Curvy Leaves'
Memory Box 'Fancy Blossoms'

Stamp:
Lili Of The Valley 'Vintage Backs' collection (discontinued)

Stencil:
Tin Holtz 'Bricked'

Other:
Spider Web
Twine
Gems
Embossing Paste


Challenges I'm Entering...

'Flowers'


'No Design Paper'


Challenge #112  'Anything Goes'


'Tear'


If you have the time, why not join us at Tag You're It?
We would love to see how you've been inspired to play along.

Wishing you a happy/restful/peaceful weekend...

Donna. x

Sunday, 31 May 2015

Strawberry Tag, Thank You, Bees + Flowers

Have you seen the latest challenge over at Tag You're It?
I so had to play along with this one  :)

The guest designer's tag features strawberries, red, white and green colouring, gingham...  and it's a double tag.

I couldn't help myself.  I had to make a strawberry shaped tag for this challenge...  and a matching mini treat box.  I was sorely tempted to go the whole hog and make a mini basket for the My Favourite Things (Die-Namics) Berry Box.  I still might, you know!


My tag started off as a Memory Box Grand Heart Die, embossed using a Cuttlebug Swiss Dots folder and inked up a little using Tsukineko (Memento) Rhubarb Stalk.  I cut and embossed two of these, gluing them together to hide the brad fasteners from the Memory Box Fancy Blossoms 'strawberry flowers'.  Once dry, I cut a little from the bottom to make a more natural looking strawberry shape.

The strawberry 'leaf' is in fact a Stampin' Up Large 5 Petal Flower Punch, inked up using Tsukineko (Memento) Olive Grove.  I've also glued on a second wooden green leaf (it's really a wooden green flower!) for one of the bumble bees to sit on.

I just love the Memory Box Jolly Bumble Bee.  These guys are so fiddly to make, but when shaped I think they look fantastic.  I love nature themed dies, anyhow...

The Thank You is from a punch by Martha Stewart, cut from Kraft card and coloured using a Stampin' Up Chalk Marker.  I've scored between the 'N' and the 'K' because I think it looks better that way.

The smaller strawberries are one of my newest dies from Poppystamps, called Berry Best.  I embossed them using yet another different strawberry die from a set by Sizzix (Thinlits/Sweet Strawberry).  The tag is also from this set, with a faint gingham design stamped on to echo the original design inspiration (see below).


I've left the beige strawberry tag blank except for inking up the 'leaves' as I did for the front one.

Some natural twine to tie the two together...  and finished just in time to post before the end of the challenge  :)

PS...  I forgot to mention that the treat box can be tied to the tag if so wished.  I chose not to for the sake of the photograph, but would tie them in reality.

Half term's over here so back to an early start tomorrow.

All the best...

Donna