Monday, 22 August 2016

Flower Tag, Vellum, Thinking Of You

Are you playing along with the current Tag You're It challenge?

If you are you will know that our Featured Artist is a lady by the name of Michelle Short.
Michelle created a tag full of colour, with one single flower that had a lot of petals!

Here's my version of Michelle's tag - made into a card so I can play along at CAS Mix Up, too.


Cards with shiny surfaces are notoriously difficult to photograph, so here's a close up shot that shows the colours in a truer light...
(If you look closely, I think you can even see some sparkle).


When I looked at Michelle's tag, I was struck by the intensity of her bright, bold colour choices.  

Let me show you so you can see for yourself...


To make this design 'me' however, I had to look past those beautifully vivid colours and see what else I could see.
A bold black outlined flower stamp with a coloured centre that draws the eye in, lots of petals, some text...  and a very pretty splodgy/dotty background.  
I can work with those, I told myself...  and set off to create my tag.  

I decided that I wanted to make something that was the 'polar opposite' to Michelle's tag, yet it still holds true to many of her design features.
I knew immediately that I only had one stamp that was similar to Michelle's.  The outline isn't as bold, but good enough for what I wanted to achieve.
Stamping the flower image onto vellum a few times - twice for the bigger flower, once for the first, (plus one bigger flower centre),  gave me my 'multitude of petals' look.  
But can you see that those petals don't really look like vellum?

Here's how I did that...

Use Black Stazon Ink and stamp image directly on to the tag.
Then...
Use Black Stazon Ink to stamp images directly onto vellum.  (Reminder: Two large flowers, one small flower, plus one large flower centre).
Flip vellum over so the stamped images are on the back, tape down (otherwise the vellum will curl like crazy) and apply a few thin layers of White Gesso
Leave to dry.
Then...
Cut out one big flower.
Do the same again, only this time leave out a few petals at random intervals whilst cutting.
Cut out the large flower centre and the smaller flower.
Using a Red Marker Pen, carefully colour all of the centres of the flowers.
Leave to dry.

BEFORE assembling the flowers...  
Colour the flower stem with Green Marker Pens, add splatters of Twinkling H20's to the tag (not a colour lift like Michelle's design, but it still gives a splodgy look - even if mine's much more sparse)...  and add an embossed sentiment.  (I stamped mine in Black Stazon Ink again, but before inking up in Black I inked up in Perfect Medium embossing Ink first.  Just stamp the text as normal, then add a clear embossing powder, shake off the excess and heat set. 

Now to assemble the flowers...
Put a small dot of glue behind the centre of the small flower, align with the stamped image on the tag and glue into place.
Do the same with the large flower, then layer on the flower with partial petals, followed by the flower centre.
Leave to dry, then shape petals on the large flower using the side of a thin paintbrush to curl around.
Mask off both flowers from the rest of the tag by placing scrap paper under the petals.  Make sure that the tag is completely covered by scrap paper and that only the flowers are showing.
Then...
Spray with Glitter Varnish and leave to dry.
(Not only does the Glitter Varnish leave a beautiful finish to the petals, it also acts as a sealant for the water soluble Marker Pen that were used for the flower centres).

Once the main body of the tag was done, I added a ring link.  This was made by gluing three layers of the die cut together (see Supplies Used for the die used), and then adding a layer of Crackle Accents to both sides and allowing to dry.  
Once dry, the link was thread through a Chain die that was treated to a layer of Silver Gilding Wax.  (I had to cut the link to do this, then glued it back together with a spot of Collall Tacky Glue).

All that was left to do was to make a quick background.
I used an Embossing Folder on a piece of Kraft Core Metallic card, sanded it to see some of the core beneath...
...  and then glued everything into place - using 3D Gel to add dimension underneath the tag.
Then I mounted the whole thing onto silver card stock for colour continuity.

It's not as complicated as it all sounds - I promise!
I'm just a very 'wordy' person!


 Why don't you come and join in with us at Tag You're It!?
The current challenge started on Friday so there's plenty of time to play along.
We'd love to see you there. x


Supplies Used:

Stamp:
Uniko 'Pure Florals' - Cosmos

Dies:
Mama Elephant 'Tags A Lot'
Poppystamps 'Delicate Chain'
Poppystamps 'Righteous Rings'

Ink:
Stazon 'Jet Black'
Ranger 'Perfect Medium Embossing Ink'

Marker Pens:
Stampin' Up 'Raspberry Ripple'
Stampin' Up 'Gumball Green'
Tsukineko/Memento 'Bamboo Leaves'

Embossing Folder:
Sizzix/Tim Holtz Texture Fades 'Distressed Frame' 

Other:
Twinkling H20's  - Pearl Blue
Pebeo Gilding Wax - Silver
Tim Holtz Kraft Core - Metallic
Stampendous - Clear Embossing Powder
Collall - 3D Gel Glue
Crafters Companion 'Spray and Sparkle' - Pearl Diamond


Challenges I'm Entering...

CAS Mix Up Challenge
(I chose Stamping, Spray Varnish, Markers and Twinkling H20's 'Splatting')


Simon Says/Wednesday
Make For The Border


Pixies Crafty Snippets Challenge
(The whole tag's made from snippets)!


I hope you had a good weekend and are ready for whatever today brings your way...

'Crafty Hugs' to you...

Donna. x


*


I went out early this morning and came home to be greeted by some lovely Happy Mail...  
My first Pocket Letter from my very lovely craft friend, Hazel Kingvig-Paul.
Thank you so much, Hazel.
You sure did brighten my day.

I couldn't quite fit it all into the one photo, though...


Isn't it amazing?
So much thought and attention to detail...
...  And what a lovely way to use up some of those odds and ends that I know we all have.

Sending you a very big thank you 'hug', Hazel. 
Mwah. x

Wednesday, 17 August 2016

Graceful Branch Oval, Flowers, Brusho's

Memory Box have a new challenge this month with the colour theme 'Yellow'...  and given that not that long ago I was able to face my aversion to this colour on their Tic Tac Toe challenge (June 2016) I decided to embrace it head on...  well - as much as I was able to, anyway!

Here's my card...


...  and one close up shot.


Believe it or not, the background set within the oval is actually made from two Brusho colours - Grey and Yellow.  I find that Brusho acts a lot like a colour wash if you spray it enough times on watercolour paper AND you're not too heavy handed when applying the powder!

This was a relatively easy card to make.  
Once the background was done it was simply a case of cutting and shaping a few dies, a smidge of Paper Distressing, adding Inks, Lace and Twine/Cord and Dew Drops...  and no glitz, shimmer or bling in sight.  Dew Drops don't count as 'bling' do they?
As I wanted this card to have quite an 'earthy' feel to it, I've even distressed the two purple flower centres a little.


Supplies Used:

Dies:
Memory Box 'Graceful Branch Oval'
Memory Box 'Fabulous Phlox'
Memory Box 'Peaceful Butterfly Wings'
Memory Box 'Flower Mound'

Ink:
Tim Holtz/Distress 'Mustard Seed'
Tim Holtz/Distress 'Walnut Stain'

Brusho:
Grey
Yellow

Other:
Twine/Cord
Holtz Distressing Tool
Lace
Dew Drops


Challenges I'm Entering...

(All snippets - Except for the dark green card)


Close To Nature


Challenge #55   Doily and/or Lace


Made For The Border


There's still time to play along with these challenges.  Will I see you there, listed in the Mr Linky section...  I wonder?

'Bye for now...

Donna. x


*


Wednesday, 10 August 2016

Shaker Box, Caterpillar on Branch, Wood Effect

 I've been on a bit of a recycling/upcycling mission this past few weeks - reusing acetate and cardboard packaging on my last tag AND on today's craft project.

You see, crafting costs a small fortune.  We all know it does.  But then many hobbies do.
So if I can cut costs AND do something that's good for the environment, well then...  I'm just going to go ahead and do it.
I encourage you to do the same.  You've not got much to lose if it was heading for the recycling bin anyways!
(I'm just going to pretend you all recycle.  It's none of my business whether you actually do or not). 


Anyhow...


This month's Poppystamps challenge has been delightfully called 'Shake It Up'.
I wanted to play along, so I got out my Poppystamps dies, (well actually, I got out the 'cut outs' of my Poppystamps dies) and played around with a few ideas before settling on one design.
One design that morphed into something else en route!  Heck, it morphed so much it's not even a card anymore!
You're no longer surprised by that, are you?


Let me show you what I've ended up with...


...  and one close up shot...


I've taken a few photo's as it's really the only way to give you any idea of what it looks like underneath the Nail Glitter/Flower Soft 'snow'.
Have you noticed that those three pink Flower Gems don't seem to have moved at all?  You would be spot on if you had.  I glued them into place on the Brusho background as they were far too integral to the design to shake around wherever they please!

This is a very 'girly' design, isn't it?   Would you give it to an adult, or only a child? 

I have to be honest and say I've never spot coloured with Glossy Accents before.  
I'll leave it to you to tell me whether this was inspired or insane.  (My husband certainly doesn't like it one little bit.  He likened it to something I shan't mention in case you are eating right now.  Let's just say I have similar thoughts every time I look at my bottle of Stickles 'Sprinkled Sugar')!

Did any of you noticed that my branch isn't embossed and want to know how I managed that?

Sizzix have a range of Embossing Diffuser sets that have aperture's set into them.  I used the Circle from Set #1 to effectively 'mask off' the branch from being embossed along with the rest of the card.  Just something else to add to that busy/plain balance I was striving for.

I guess I should tell you which part of this box lid uses recycled cardboard as the acetate's pretty obvious, isn't it?!
See that spotty/snowy base that everything else is glued on to?  It's been recycled from that super shiny cardboard you so often get with Embossing Folders.  
After using Spray Mount to attach some White Card to the back of this pretty piece of shiny card, I cut it into shape (Tattered Lace Box Die) and then ran it through the machine with my 'Snow' Embossing Folder.  And then I gently sanded it!
I just love this technique.  It's super easy and very effective...  and I'll be using it again closer to Christmas as I still have a little of this repurposed card left.  Yay!

A tiny touch of Stickles underneath the two Silver Gems, Flowers, Leaves, Blue Gems and a touch of Distressing and Black Ink around the edges...  and this was finished.
Except that I now had to make the box base!


Supplies Used:

Dies:
Poppystamps 'Cute Caterpillar'
Poppystamps 'Quiet Bird Sash'
Poppystamps 'Dogwood Blossoms'
Poppystamps 'Meadow Leaf'

Embossing Folders:
Sizzix/Texture Fades 'Woodgrain'
 Crafter's Companion 'Snow'

Ink:
Holtz/Distress 'Black Soot'

Other:
Brusho  'Grey'
FlowerSoft  'Polar White'
Ranger/Stickles  'Sprinkled Sugar'
Ranger 'Glossy Accents'
Flower Gems
Gems
Nail Glitter 


Challenges I'm Entering...

(Apart from the Recycled Card and the White Card needed to make the box base, it's all snippets)


(Try To Contain Yourself)


Thank you so much for stopping by today...

Donna. x

Friday, 5 August 2016

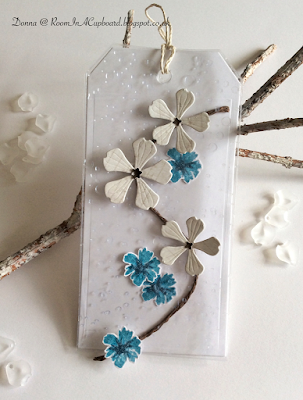
Flowers on String, UpCycling, Acetate

A new challenge starts today at what I now like to unofficially call 'Tag You're It' Friday.
(I can't help it.  I like the way it sounds).

My design for this challenge started off with every intention of being quite true to our Featured Artist's inspiration tag...  but then it digressed into something quite different.


Let me show you my tag...


...  and at a different angle...


...  and the tag created just for us by Michele Ferguson.


The similarities are there...


I focused on those pretty blue flowers, decided to upcycle some cardboard packaging from my Gorjuss patterned papers collection to create more flowers (there are two kinds on Michele's tag) and then stretched out my design on to a piece of string instead of keeping it quite compact on the leaves.
Don't ask me why.  
 (I may have mentioned this before, but my brain often takes 'interesting' detours when I'm crafting)!
I will say that the original intention was to use a branch in place of the leaves, but I decided against that as I felt the design would get too busy.
So string it was!
And I have used two tags (just like Michele) - it's just that one was cut and embossed from acetate before being partially glued into place over the other one.

I even managed to include dark centres on my flowers - just like the dark centres on Michele's blue flowers.
So all in all I didn't digress that far off track...  although I did sneak in one final sparkly touch before gluing everything into place!


Here's a close up so you can see it...


Supplies Used:


Die:
Sizzix/Framelits 'Tag Collection'
Memory Box 'Fabulous Phlox'
Memory Box 'Flower Mound'

Stamp:
SugarPea Designs 'Funky Wreath - Spring Edition'

Ink:
Tim Holtz Distress 'Stormy Sky'
Tim Holtz Distress 'Broken China'

Embossing Folder:
Crafter's Companion/Textures Elements 'Snow' (8x8)

Other:
Ranger/Stickles 'Sprinkled Sugar'
String


Challenges I'm Entering...


Challenge #153   'Gift Tags'


Fabulous Florals


Week #374   'A Touch Of Sparkle'


We would love to see how Michele inspires you to play along, so why not join us?
Have a happy weekend.

Donna. x