Showing posts with label Thanks. Show all posts

Friday, 11 October 2019

Tag You're It, Fall Leaves

It's time for another Tag You're It challenge to begin...


This one's all about Autumn leaves.

I've gone with Brusho's as my medium of choice as they sure do 'pack a punch' when it comes to adding colour. 


This tag has been built up on an acetate base layer using Tim Holtz's Crackle Medium.


Want to join in with us?

Here's the inspiration photo...


Thanks so much for stopping by...


*


Donna. x

Tuesday, 11 July 2017

Butterfly Tag Card, Garden Theme, Friend

I made this 'tag' card a while ago but just haven't got 'round to posting it until today.
The inspiration for it came from a photo set up I used when posting this tag part alone on a recent blog post for a past Tag You're It challenge/my DT take on the Featured Artist.

It's a 'busy' card...  


(Apologies for the slight blur on this photo.  It's a real close up shot - but I wanted you to see the texture from sanding down a piece of Core'dinations card stock).


I seem to be in a habit of making busy cards right now - and I don't honestly know how I feel about that.  
Do people like busy cards (generally speaking) or is it a bit like a pizza with too many toppings?

But at least I've been sticking with my nature theme.  

Speaking of which...

Have you had any 'fluff puffs' in your garden?

Now you may be wondering just what a 'fluff puff' is.
Well...  they are fluffy and they're puffy and they sort of 'flitter' their wings in such a cute little way right before being fed.
And 'fluff puff' just suits them so much better than 'fledgling' when they are at their cute stage.

What am I talking about?
Baby sparrows.
Apparently in decline...   unless you come to our garden.  
Then you'll see staged feeding frenzies of activity, group dust bath sessions...
A sight of pure cuteness.

I'm sorry to say that one fledgling got misplaced by it's dad for a whole 10 minutes on the first brood of this season.
How do I know?
Because I heard it calling out for the entire duration - and then looked out of the window to watch it.  If you've heard a sparrow calling at feeding time you'll recognise the sound as it's a single, solitary (fairly high pitched) 'cheep' noise that's as long as the silence in between the 'cheeps'.  
(If I had to hazard a guess I would say a second per 'cheep')?
The poor little darling kept hopping around on the ground  - and at one point it made its way over to two slightly older girls...  and opened its beak in readiness for food as they moved a little closer - to fly off!
10 minutes must have seemed like a very long time...  and it didn't once stop calling out until found!

...  And we're on brood three right now by the looks of things.

But I digress...


So what did I use to make this card?


Supplies Used:

Dies:
MFT/Die-namics Tag Builder - Blueprints 4
Taylored Expressions 'Beauty Lies Within'
Memory Box 'Blissful Butterfly Border'
Memory Box 'Tall Grassy Stems Left Corner'
Papertrey Ink 'Wet Paint Cuts'

Martha Stewart Punches:
 'Pop Up' Butterfly Border
Cherry Blossom Trim

Memory Box Stencils:
Delphinium
Stems

Holtz/Distress Ink:
Dusty Concord
Seedless Preserves
Milled Lavender
Victorian Velvet
Bundled Sage
Forest Moss
Mowed Lawn
Walnut Stain

Other:
Stamp from stash
Twine - Natural
Ribbon
Glitter Card Stock
Distressing Tool
Sand Paper


Challenges I'm Entering...

(All scraps except the green tag base).


'Distress It'
(Sanded Core'dinations Card Stock + Partially/Slightly Distressed Edges)


(Challenge #76  -  Layers)


'Anything Goes'


I'm still in catch up mode right now, but I'm getting there.
Thank you so much for your kind words of support...

Donna. x

Wednesday, 28 June 2017

Distress Crayon Card, Rainbow of Colour, Thanks

There's a Poppystamps challenge that's almost at its end, but I've managed to make 'something' for it.  I say 'something' as at home I refer to this as my 'Crayola card made by a three year old'...
Crayola's not just a UK brand, right?
  
Take a look at you'll see what I mean...


It's kind of hideous...  but it kind of works (I think/hope)!

I don't embrace lots of colour so I'm never going to say anything too wonderful about this design - but at least I chucked in lots of white (or similar) where I could. 

And no...   I didn't really use Crayola Crayons.

Distress Crayons - use a light coat of Distress Collage Medium - Matt (or similar) to cover the card base first.  Helps the crayons to blend when smooshing colours.
But do use a dry baby wipe to smoosh/blend colours or your finger will start to get very warm!

And yes, as you can tell I went for a smooshing/scribbled look.
But then I don't do 'neat'...  it kind of freaks me out.

So I've smooshed and I've scribbled.
And I've embossed onto vellum, recycled an old purse only fit for the bin, made a tiny box frame that yes, I did purposefully choose not to stick together too neatly...
and I've done some 'selective' distressed edges.
Because I can and I like them.
And no distressed edges was too neat and all distressed edges would have been too much.
Perfect logic...

I've also messed around with layers - that 'thanks' has six or seven and the centre of the daisy in the frame has even more.  Seem to remember it being in the 'teens' somewhere  (didn't want to use sticky pads as used those under the frame).
There are also a few layers on the butterfly, the cream 'purse' flower centre and that rectangle underneath the vellum has a few, too.

I like messing with layers as it adds something depth wise...  but apparently camera's aren't so keen  - hence the blurriness in some places.
It's also very time consuming and no fun at all.

But at least it kept me busy for a while...


Supplies Used:

Holtz/Distress Crayons:
Festive Berries
Spiced Marmalade
Mustard Seed
Twisted Citron
Peacock Feathers
Mermaid Lagoon
Seedless Preserves

Dies:
Sizzix Originals 'Shaker Box' - Square w/Window
Poppystamps 'Ragged Daisy'
Poppystamps 'Viola Leaves'
Memory Box 'Peaceful Butterfly Wings'
Memory Box 'Blissful Butterfly Border'
Memory Box 'Tall Birch'
Papertrey Ink 'Wet Paint Cuts'
Spellbinders 'Nestabilities' Rectangle
MFT 'Rectangle Peek-a-boo Window (Die-namics)

Ink:
Holtz/Distress - Walnut Stain
Tsukineko/Memento - Tuxedo Black

Other:
Stencil - The Crafter's Workshop 'Art Is'
Holtz Distress Collage Medium
Embossing Powder - Clear
Embossing Folder - Cuttlebug 'Butterflies 3x3 Tag Team Combo'


Challenges I'm Entering...

PSC #33     'Rainbow Wishes'

An entire card full of snippets 


So this card won't win any prizes and may in fact be more awful than I realise, but that's ok as it gave me time to experiment with four 'new to me' items - most of which I've had for a while now.
(I have been told on more than one occasion that I'm too hard on myself...   but as that will never, ever change we may as well all accept the fact that if I post something and think it 'sucks' - even if only a little bit - I'm just going to go right on ahead and tell you).   

*

For those of you that know me...
Life's a struggle right now and I just hurt - a lot.
So yes, I've been missing...  and yes, I'm not ok.
But I'm better than I was.
I just need a little more time., then I'll face catching up with you all - which I will, so don't bother telling me not to. x
I'm just not up to pretending right now.
But I have missed you...
and I thank those of you that know me well enough to know already that me disappearing = me going through rough times.
And you who knows but gets in touch anyway because she's worried (you know who you are) - thank you, too.
You are all far more of a blessing than you realise.

And for those of you who don't know me and have no clue as to what I'm going on about...
Let's just say that life can be very unfair and I'll leave it at that.
After all, we can all relate to that at some level or other.


And so as not to completely depress you all...
Think of something you like to do that makes you happy - and then (as long as it's safe for you/others and it's not illegal) go make time and do it this week if you can.  

Thanks for stopping by today...

Donna. x

Wednesday, 26 April 2017

Sticky Note Holder, Leaf Window + Twine, Thanks

I haven't specifically made something to play along with a challenge since October of last year...  and for those of you that know my 'story' you can probably guess why.  But I just couldn't help but be inspired when I saw the latest Poppystamps Challenge.


I've taken the inspiration quite literally and made a gift...
It's much simpler than it looks and I've included steps that can be missed out for an even easier version.


 Believe it or not, this project started off as the cardboard backing from one of those A5 brown envelopes.  You know the kind I mean, don't you?  They have a reinforced back panel and the words PLEASE DO NOT BEND printed in red on the front.  Well, that's what they look like in the UK anyway...

I hadn't initially planned on repurposing this cardboard back panel but as it was the perfect length it seemed ludicrous not to.  Just one chop off the end to adjust the width (using a guillotine) and two score lines later and my job was already a third of the way to completion as now I only had to decorate it, increase the depth of the panels a little and think about a fastener of some kind.

Decorating was easy.  
A good coat of white Acrylic Paint all over and then (once dry) simply tear up some thin Mulberry Paper and paste it on using a mix of PVA and water.  
(I started by covering the edges and the cracks I made when I made the score lines first.  This took two coats of paper - as did most of it).

My front decorative panel has also been made from repurposed materials.  
You may not see it in the photo's, but this Leaf Window panel has a sheen to it that comes courtesy of some MFT packaging.  I simply used my Die-Namics Stitched Square STAX to cut out the largest square, then centred the Leaf Window die and cut again.

After weaving in the green Hemp Twine (a gorgeous colour but too thick, so I had to untwist a length and then carefully thread it through) I mounted this front panel onto the largest of the three 
Die-namics Stitched Square Frames.  
Then I added on the stamped and heat embossed acetate layer, followed by another Die-namics Stitched Square Frame  - effectively creating an acetate 'sandwich' that then had an inked up piece of card (one of the squares left over from cutting out the frame) added as its back layer.

Why so many frames and layers?
Just to give the illusion of more depth, but you can easily miss that part out if you want a simpler version.

As for the flowers?
They were added right at the end of this project so I'll give details about those later...


You'll see from the photo's that the inside of this project carries on with me using the 
Die-namics Stitched Square STAX.
Layering up three of these top and bottom created the perfect depth that I needed, 
but before I glued these squares into place I added two thin lengths of black ribbon, both of which were wrapped around a 1cm thick length of scrap card.
These small card 'tabs' were then glued into place...  and while they were drying I used the time to add two holes (I used a pokey tool) to one of my layered up Stitched Squares.  

I didn't have any black elasticated cord that was thick enough so I braided three strands together (as you do).  Then I threaded it through the holes and put the small pencil into place before tying off at the back.  This way the elastic loop that's been created will be the perfect size.
(You can also skip this step if you like by using 100mm Sticky Notes instead.  I used 75mm Sticky Notes for this project).

Once the inner Stitched Squares were glued to the inside I simply had to add the Sticky Notes and then finish off my 'fastener' by adding a wooden bead and tying/gluing a double knot into place.
(Again, this is another step that can easily be omitted.  I just wanted to try out a 'fastener' idea that I had in mind, but this design works just fine without).

Then I added the flowers, using a small amount of Crackle Accents at the centre of each to mirror the shine of the acetate.


I have to say that I love this Hemp Twine weaved Leaf Window so much that I'm going to be using it again...  and maybe again...  and then again, too!
CAS with added dimension and/or texture is where my heart lies if I'm doing CAS work of any kind.
I'll never be a CAS purist, but that's ok with me.
We are all uniquely different, after all...


Supplies Used:

Dies:
Poppystamps 'Leaf Window'
Poppystamps 'Dogwood Blossoms'
Die-namics 'Stitched Square STAX'
Die-namics 'Stitched Square Frames'

 Ink:
Holtz/Distress Antique Linen
Holtz/Distress Walnut Stain
Ranger 'Perfect Medium'

Embossing Powder:
Stampendous - Black/Fine Detail

Stamp:
PSX 'Thanks - Bold Writing Script'

Other:
Sturdy Cardboard - cut to size
Mulberry Paper
Heat Resistant Acetate
Thin Ribbon
Wooden Bead
PVA Glue
Elastic Cord - Black
Ranger 'Crackle Accents'
Sticky Notes
Small Pencil or Pen


Challenges I'm Entering...

Poppystamps
Challenge #31    'Gift It'

Pixies Crafty Snippets Challenge
(Some snippets used - acetate, flowers and some of the squares)


Simon Says/Wednesday Challenge


As You Like It
(Favourite Colour and Why - Green.  It can be vibrant or soothing, and I love it because it reminds me of nature).


Allsorts Challenge
Week #142    'I Spy...  B'
(B is for brown, B is for blossoms, B is for bead)


(Just for Fun).


(Challenge #44     'Embossing - Heat or Dry)


(The Letter 'B')
B is for brown, B is for blossoms, B is for bead...


Enjoy your day...
Donna. x

Friday, 25 September 2015

Tag Card/Thanks, Embossed Leaf, Female

Hello.

I did promise you that not all of my designs would be Christmas themed from now on, do you remember?

Well, true to my word I've created a Thank You 'tag' card...  and not a hint of a Christmas theme or brown ink in sight.  (I said no brown ink...  didn't say anything about brown twine or a brown 'thanks' sentiment)!!!

This 'tag' card is for the latest challenge at Tag You're It.  
If you haven't tried playing along I would encourage you to give it a try.  It's a fantastic way to use up some of those craft scraps...  and who doesn't have use for a tag?  I sure do :)

Here's my design...


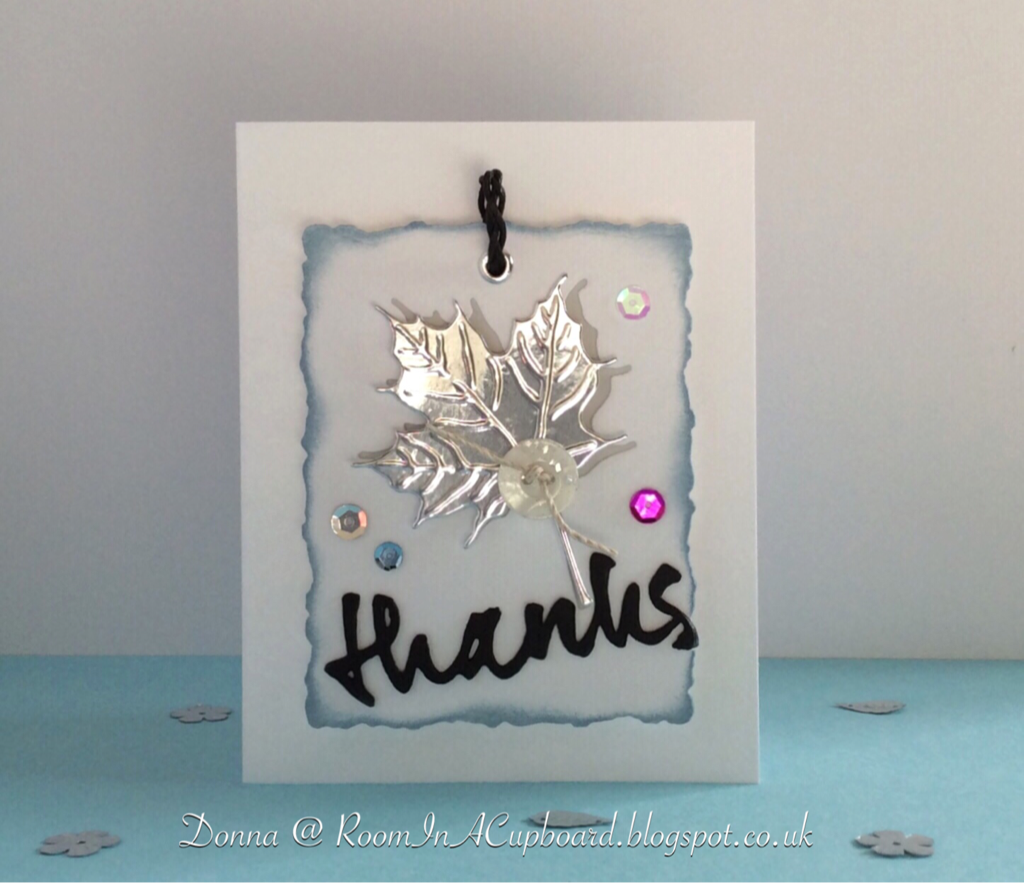
I have to be honest and say that I didn't initially set out to make a 'tag' card...  but that soon changed once I settled on my choice of leaf die and realised that every single traditional tag shape I owned just didn't look right when paired with it.

No problem.  I paired it with my Spellbinders Distressed Rectangle die instead :)

Who said tags have to be 'tag' shaped, anyway?


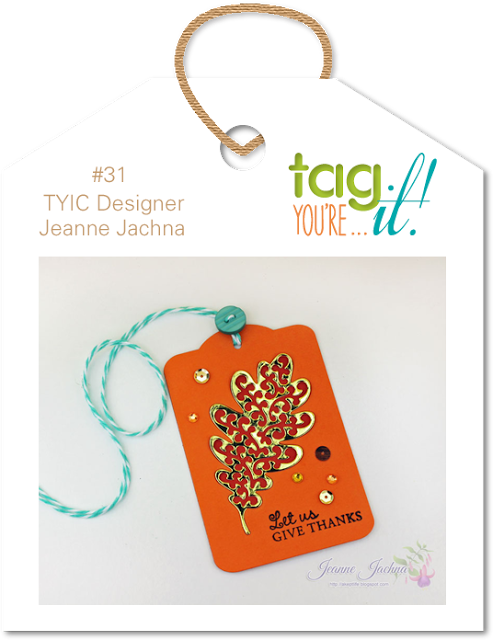
Can you see which parts of Jeanne's tag I've taken my inspiration from?

As I have no filigree leaf I've opted for an embossed one instead and offset it against a negative 'cut out' of itself.  I've included the button, the sequins of different shapes, sizes and colours and swapped out a 'thanks' stamp for a 'thanks' die cut that has a few layers glued together for dimension.  Attached the leaf using 3D glue...  even edged my tag with blue ink to echo the colour of Jeanne's twine ;)

If you have the time, come and join us.  There's a prize on offer again this month :)


Challenges I'm entering... 

(Make it Sparkle/Challenge #148)


(Sparkle/Week #148)


(Anything Goes/Week #195)
Leaf & Thanks made from 'snippets'


(Sparkle and Shine/Challenge #265)


Have a good weekend...

Donna

Monday, 14 September 2015

Filmstrip Card, Thank You, Male/Female

Hello.

Now...  try not to faint...

I'm posting a card today that has nothing to do with Christmas!

This card was made as a favour for my husband and he specifically asked for my Marianne Designs Filmstrip die to be used again...  so he can showcase some of his photo's whilst saying 'thanks' to a fellow photography friend.

On the plus side, this gave me a chance to CASE my own design that I had used quite recently but wasn't quite sure I was happy with.  
There had been a few glitches along the way that I knew I needed to avoid this time around  (TOP TIP...  Using Core Dinations worked ok for the Filmstrip until the glue was added for the photo's...  then it started curling...  so go for thicker cardstock than that and you should be okay). 
I also wanted to try and add to the somewhat 'bare' feel that the card had had before.


So this time I've paired up my Kaisercraft Film Edges stamp along with some of the stamps included with the Filmstrip die, used a Darice 'Tattered Page' embossing folder, added three clear Morning Dew Drops and gone for three, rather than two filmstrips.  
More matt silver cardstock (Core Dinations 'Metallics'), less Kraft card, a 'thank you' punched sentiment from Martha Stewart...  and a shiny silver card base.  
Makes this card gender neutral, I think...  except for possibly some of the photo's!!!

For those of you who may be wondering about the slight curve you can see...  don't worry, the card's not bent at all.  
A pet peeve of mine is cards that open up with a top spine that then go 'splat' when on display.  
My remedy for this is to use a scoreboard to create an inverted 'v' shape at the bottom of the card that acts as a glued plinth for the card to sit on.  
Yes, it's more time consuming...  but the final result is worth it...  I hope!!!

I'm adding this card to the following two challenges...

Cuttlebug Mania 'Anything Goes'


and


This card will have to be weighed and sent off to America.  I wonder how long it will take to arrive?

Take care...

Donna

Wednesday, 22 July 2015

Butterflies on Wall (CAS), Thanks, Female

I'm squeezing in a last minute entry today for a colour challenge over at
CAS Colours & Sketches.

Here's my quick make...


Using a piece of white Hammer Card for my base I've stamped off a 'Bo Bunny' Wall To Wall Textures Clear Stamp for the background, using Memento (Tsukineko) Rich Cocoa.

I've also used Memento (Tsukineko) Rich Cocoa for the Designer Butterfly Stamp (Hero Arts) and the Thanks sentiment.  I used a piece of plain white card to stamp the second butterfly onto as I like to include different textures - even in a CAS design.  Once the ink was dry, I simply fussy cut and glued into place.

One flower stamped in Memento (Tsukineko) Rose Bud and two stamped in Memento (Tsukineko) Teal Zeal, and the stamping was finished.  As you can see, I also stamped off for one of the Teal Zeal flowers.

All that was left to do was to mount on to a piece of brown card a little larger in size (I've used a Paper Distressing Tool on the edges for a smidge of extra texture), glue into place on a card blank and add three jewel embellishments as centres for the flowers.

Here are the details of the CAS Colours & Sketches current challenge...


It's my first time playing along here...

It's always nice to discover new challenges, don't you think?

'Bye for now.

Donna


Sunday, 14 June 2015

Apple Tag, Stamped, Thanks

If you've seen my previous post you'll see the similarities between this tag and that one immediately.  
Same colours, same stamp...  it's just that this time around I've used hammer card rather than flat, matt card.  It really has made a huge difference, hasn't it?


For those of you who haven't seen the previous post, I've used a Tsukineko (Memento) 'Lady Bug' and a Stampin' Up 'Gumball Green' Marker Pen, scribbled onto an acrylic block, spritzed with water and stamped directly onto hammer card.  

Once dry, I simply stamped on the image (Stampers Anonymous Schoolhouse Mini Cling Stamp Set) with Stazon Black Ink, added a sentiment from Inkadinkado, three clear sequins and some twine :)

I may try and squeeze one more tag design in before the deadline.  I've had a bit of a blitz on them recently, have you noticed?

Yet another entry for the latest Tag You're It challenge...


Hope you're having a good day :)

Donna.


Apple Tag, Stamped, Thank You

With the end of the final school term fast approaching, I realised I needed to make one final apple tag for a man...  So this seemed like the perfect excuse to try out the apple from my newly acquired Stampers Anonymous Schoolhouse Mini stamp set :)

As I've also been wanting to try out a very quick and simple technique I read about many months ago that involves scribbling onto an acrylic block, spritzing with water and then stamping onto card, I've combined the two into one.  Trouble is...  I couldn't decide on what kind of card I wanted to stamp onto, so I've ended up with two tags (other shown on the next post)...  both very different despite their similarities.


I've used a Tsukineko (Memento) 'Lady Bug' and Stampin' Up 'Gumball Green' Marker Pen for my apple colour combination and paired that with the 'Thank You' punch by Martha Stewart.  Can you see that I've layered a black layer over white to create a shadow effect?

I wanted more black in this design, so I added a plain black second tag (with a second white layer glued behind for writing on) and some black and white twine.

Quick to make...  and it will look good tied around a bottle of Whiskey for my daughter's SENCO :)

I'm also adding this tag to the current Tag You're It challenge.


'Bye for now...

Donna.

Thursday, 11 June 2015

Double Tag, Apples & Leaves, Thanks

This is the second of my apple tags I've made to join in with the newest Tag You're It challenge, and as you can see there are some similarities to my shaker tag posted yesterday.


Once again, I've used the PaperSmooches Tags 2 set.  I always cut two for my base and glue them together as I like the added durability it gives to the tags.  I've also used the Poppystamps 'An Apple a Day' set again, mounting the smaller one on foam pads for added dimension and again using my Stampin' Up Chalk Marker for the highlights.

This time around however, I cut and glued together five of the 'Thanks' sentiments instead of four as I knew that I was planning on overhanging the tag a little.  Five seems to give enough durability that I don't have to worry about the sentiment tearing or bending.

Maybe it's just me, but I so love this little Jigsaw die.  I have so many ideas on how to use it...  but like all things that depends on time!!!  It's by an online company called Crafter's Companion and is part of their Die'sire Essentials range.

The leaf stamp has been used with black ink on both the white and the red tag.  To finish off and carry across a little more of this colour I weaved together some strands of black raffia to secure the two tags together.

Just in case you haven't seen my earlier post, here's the design tag inspiration picture once again...


I'm also entering this tag into the latest Poppystamps challenge...

Hope you're having a good day :)

Donna.

Wednesday, 10 June 2015

Shaker Tag, Apples, Thanks

This is my first ever attempt at a 'shaker' of any sort...  and my thanks goes to Jeanne Jachna for her easy to understand tutorial on A Kept Life  :)


I'd also like to thank Tracey McNeely, Owner/Designer of Tag You're It among many other things.  She very kindly answered my query in detail and I appreciate her kindness in doing that - especially as I've just been on her blog (In My Creative Opinion) and read about how much she has going on right now.  Thank you  :)

So...  How did I make my Shaker Tag?

I've used the largest tag from the PaperSmooches Tags 2 set and cut it three times (one for the top, two glued together for the base).  I bought this set specifically for making shaker tags as my other tag dies are much smaller by comparison.

The aperture was cut from my Spellbinders (Small) Deckled Rectangle set, the 'Thanks' (I cut four of these and glued them together) is by Papertrey Ink (Wet Paint Cuts) and the apples are all from An Apple a Day (Poppystamps).  Before I forget, the highlight on the big apple was done using my Stampin' Up Chalk Marker  :)

Can you see the tiny apples inside the shaker tag with the green leaves on?  I must confess that the smallest leaves from the Poppystamps die were just too big for these, so instead I cut and 'pruned' some Ieaves from the Impression Obsession 'Leaf Cluster'.

I used a re sealable bag for my shaker...  and an acetate front sheet, securing it all together with double sided tape and mini foam pads.

As much as I love making tags, I really do struggle with the finishing bow/string/ribbon piece that threads through the hole at the top :(  In the end, I settled on a luggage tag ribbon look and threaded the red peg through.

Take a look at the design inspiration...  So CAS and so pretty...


Can a shaker card truly be CAS?  I'm guessing probably not, but I honestly don't know.

If you can spare the time I would really love to know what you think.  I've done my best to keep a minimalistic feel to it, either way!

Thanks for stopping by...

Donna