Showing posts with label Robin. Show all posts

Saturday, 9 November 2019

Tag You're It, Challenge #100 Milestone Celebration (25 Days Of Christmas)

Tag You're It is closing its doors for the final time...  so I wanted to make something extra special for this final challenge.

 It's challenge #100...  a fitting way to say goodbye!


If you head on over to HERE, you'll see that there's even a cute mini make up bag up for grabs.

I hope you'll make time to join us!


*


https://www.instagram.com/roominacupboard/?hl=en
Donna. x

Monday, 26 November 2018

Craft Consortium, Winter Woodland, Christmas Table Decoration

I thought it might be nice to revisit last years release of the Winter Woodland collection and pair it with some of the the new Essential Craft Papers by Craft Consortium.


With the addition of some decoupage papers for the base, here's what I came up with...


I have to say, I do just adore this robin!


If you are feeling inspired to have a go at something similar, here's a list of the Craft Consortium supplies that I used...


*


Craft Consortium

Winter Woodland


The Essential Craft Papers


Decoupage Paper


Little Fawn and Friends


Always and Forever


*


Thanks for stopping by...


Monday, 1 October 2018

Penny Black, XL Decorated Scroll Tag, Guest DT 2018

If you saw my last Penny Black post you will see that I'm building on my theme of adding layers and texture with this XL tag today...  and the beauty of it is, if you don't want/need the full size tag I've given you the option of just going with the round, smaller tag.


Two ideas in one!


This is my penultimate Winter/Christmas themed tag that I've designed as part of my Guest DT for Penny Black...


I do hope you've had the time to see their full 2018 Christmas release, but if not, please click on one of the two links above as it will take you straight to their online catalogue...


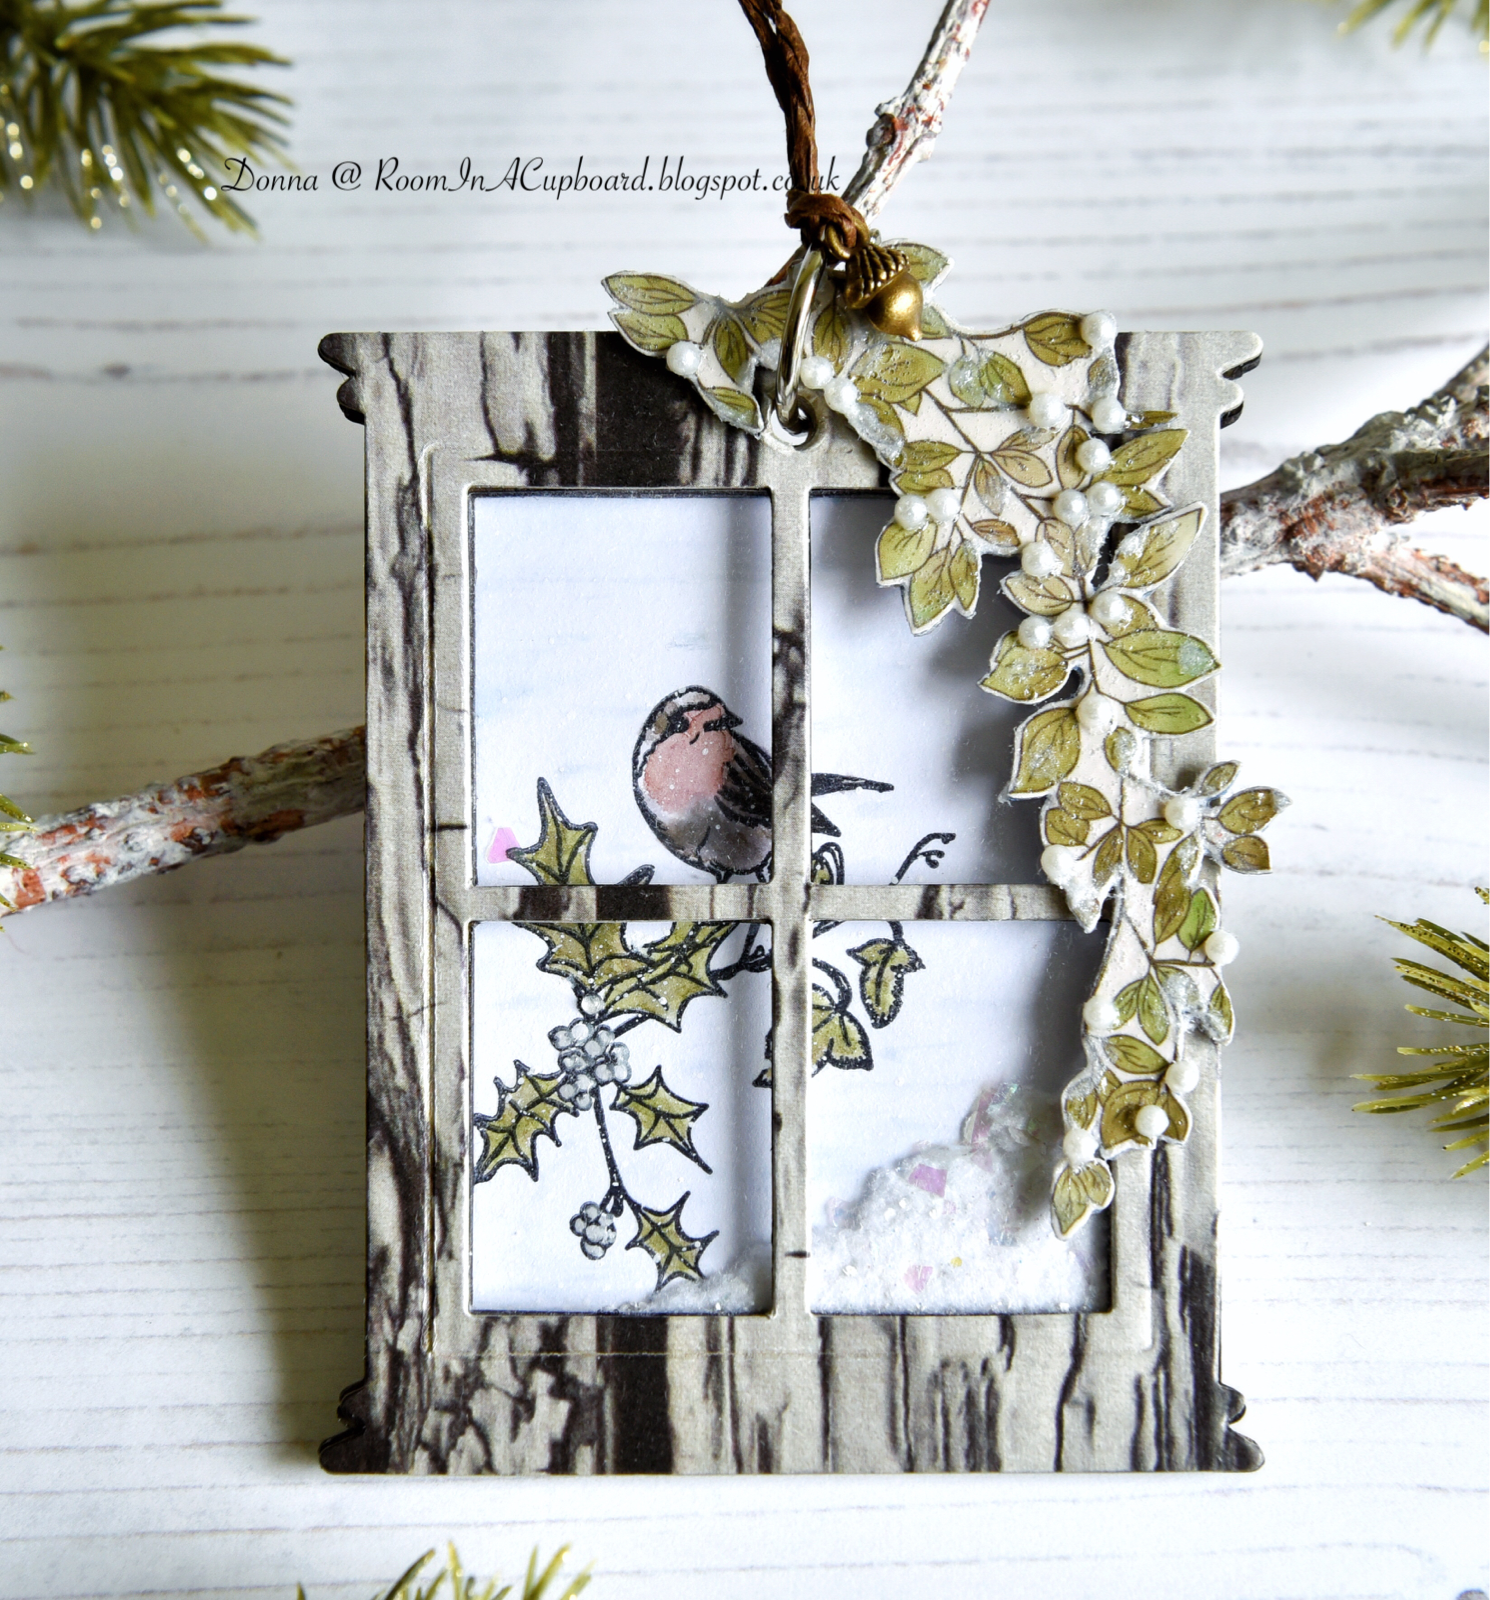
Here's my XL tag for today...


Now you may be wondering just why on earth you might need an XL tag, so here's a few ideas to get you started...


You've bought a BIG gift...  and a little tag would just be too small!

You've got lots to write and catch up on - and there wasn't enough room in the card or you forgot and you've already sealed it.

You want to add a photo to the back.

You want to use this tag to attach a gift card to.  
(Pretty tag.  Not so pretty gift card in envelope.  Attach the envelope to the back and seal it.  Problem solved).

Same idea as above, but this time it's actual money in the envelope.


And I'm sure there are many more ideas!


Below you'll see the step by step - divided into sections...


*


Let's start with that Robin...


Stamp Robin's Christmas in Versafine (Smokey Gray).
(You will need to stamp it twice, as Robin will be cut out of one to add dimension).  


Whether you cut before you colour or colour before you cut - that is entirely up to you.

I tend to favour cut before colouring simply because I hate the idea of putting all that effort into my water colouring, only to have my hand slip whilst cutting out.


With that in mind, cut out the Robin and then water colour using the following 
Tim Holtz/Distress inks:


Festive Berries
Aged Mahogany
Ground Expresso
Hickory Smoke


Add a layer of Ranger/Distress Collage Medium - Matt, and once dry glue on a tiny Black gem for the eye.


Then either turn Robin around and draw around the back of it on to a scrap piece of card 
and cut it out 

OR

Cut out a small circle (smaller than the robin) from scrap card.


Whichever you choose, glue this to the back of Robin so that it will have more dimension when attached to the tag.


*


Robin's background is a circle cut out from Robin's Christmas that has been very lightly colour washed using Holtz/Distress ink (Iced Spruce).


Cut out 3 sets of Holly Leaves from Xmas Poinsettia Cut Out, cut those apart and then colour using Holtz/Distress ink (Forest Moss).


Then glue Robin into position, add the Holly Leaves around the outside edge and trim off any excess foliage.


Add an edge/narrow frame cut from silver card stock, and then cut out 3 of the word 'Christmas' from the Holiday Edgers die cut set.
(I've cut my top layer from Warm Grey card stock and the bottom two from White scrap card).


Glue the 3 layers together, then glue into position as shown above.


If you are wanting to stop here and not proceed with making this in to an XL tag, please add another circle layer to the back for added durability.


THEN


You can either use a hole punch and make a hole for the twine 

OR

You can cut out 2 of the bell 'top parts' from Christmassy, glue those together and attach to the back of the tag before adding that second circle for extra strength.


If you are stopping here, don't forget to add the Ranger/Texture Paste now.
(Simply dip your finger in to the pot and smoosh on).

If you are not stopping here and want to proceed to the full XL tag, please wait until the end before applying the Texture Paste...


*


Die cut the largest die from Paper Scroll.
(Cut twice.  One needs to stay to one side).


Then, ink it up using the following Holtz/Distress colours:


Antique Linen
Old Paper
Pumice Stone


And once dry, glue the 2 layers together.


Next, cut a Snowflake from Crystalline and one from Christmassy.
(I've actually used the inner tube section from a finished Kitchen Towel/Kitchen Roll for my Snowflake and a small scrap of silver card for the other).  


*** (Doing my bit for the environment makes me happy)! ***


Then, cut out the longest string from Ornaments Kit... 
(I've cut mine from a Warm Grey coloured card stock)


...  and glue it on to the Scroll as shown above.


Followed by the Big Snowflake...


...  Then the Little Snowflake...


...  And finally that Circle with the Robin.


Then add Ranger/Texture Paste, Black enamel dots and punch a hole for the hanging loop.


*


You may be wondering just why I asked you to hold fire and wait until the end to add the
Texture Paste?


Truth is, I've learnt from experience that it's always better this way so that you can balance out just where you want to apply it.


*


Supplies used:


Penny Black/Stamp

40-647     Robin's Christmas


Penny Black/Dies

51-458     Paper Scroll
51-450     Ornaments Kit
51-476     Crystalline
51-453     Christmassy
51-448     Holiday edgers
51-474     Xmas Poinsettia Cut Out

*


Only one tag to go...


*


Donna. x

Friday, 14 September 2018

Penny Black, CAS Robin Tag, Guest DT 2018

I have a single, solitary robin to share with you today as I continue with my Guest DT for 


This is a Clean And Simple (CAS) design, but I have still managed to sneak in a little texture!


See those berries with a touch of red acrylic paint and the texture on that gingerbread man?

Just run your die cut through the machine again using a well loved cutting plate and you'll get similar results!


To begin with, I've used the Penny Black die Tagged and cut out two die cuts that I've then glued together - simply because I like my tags to have a little durability to them.

I've then stamped Birches very lightly using Holtz/Distress ink (Hickory Smoke).


The robin was water coloured using the following Tim Holtz/Distress colours:

Ground Expresso
Hickory Smoke
Festive Berries
Aged Mahogany


Once dry, simply add a layer of Ranger/Distress Collage Medium - Matt 
(and a small black gem for the eye).


Next, die cut the Holly Sprig and colour using Holtz/Distress (Forest Moss).


Then die cut the Gingerbread Man and layer up the following Holtz/Distress colours to achieve a golden brown colour:

Spiced Marmalade
Walnut Stain
Gathered Twigs
Pumice Stone


...  and just like the robin, add a layer of Ranger/Distress Collage Medium - Matt.


Before you assemble the tag using the robin that you've cut and coloured you'll need to stamp it again using Tsukineko/Versafine (Smokey Gray).

(Stamp straight onto the tag so that the robin will have some legs once you've glued it into position)!


Then gauge where you would like your Holly and Gingerbread Man to hang and draw on the string using the thin end of a Holtz/Distress Marker Pen (Gathered Twigs).


Do not glue anything into position yet!


Not until the tag has had a coat of Ranger/Distress Collage Medium - Crazing added to it.


Then...

Assemble the tag as shown.


*


Supplies used:


Penny Black/Stamps

40-636     Birches
40-642     Cheerful Christmas


Penny Black/Dies

51-465     Mitten Stocking
51-007     Tagged


*


This tag somehow manages to convey a real sense of stillness and peace that I personally just adore - 

so much so that I won't be sharing this tag with anyone but me!


Click here, and perhaps you'll find a die (or a stamp or two) that cause you to make something you 

don't want to part with either!


I won't tell if you don't!


*

Donna. x

Monday, 3 September 2018

Penny Black, Robin/Berry Branch Tag, Guest DT 2018

This is tag #4 out of 12...   brought to you as part of my Guest DT in celebration of the 
2018 Christmas release...

...  and as you can see, this one embraces Mixed Media with open arms!


Supplies Used:


*


Background


Penny Black/Stamps

40-631      A Berry Branch
     40-642      Cheerful Christmas


Penny Black/Dies

51-474      Xmas Poinsettia Cut Out
51-453      Christmassy


Penny Black/Stencil

25-010      Zigs and Zags


*


Method


Start by stamping the robin with Versafine (Smokey Gray) and then watercolour using
Tim Holtz/Distress inks in the following colours:

Pumice Stone
Vintage Photo
Walnut Stain
Ground Expresso
Fired Brick
Festive Berries
Aged Mahogany
Victorian Velvet.

Once dry, cut out and add a layer of Ranger 'Multi Medium Gloss' or similar, and glue on a tiny black gem for the eye.


Now get your A Berry Branch Stamp...


Using the size of the robin and the size of the leaves as a guide, cut out a circle to suit the size of tag that you would like to make.


Then, using Versafine (Smokey Gray), stamp part of the branch near the bottom, then stamp the robin above the berries using the 'masking' technique.


Watercolour the branch, leaves and berries using the following Tim Holtz/Distress inks:

Festive Berries
Aged Mahogany
Forset Moss
Peeled Paint
Ground Expresso


Then add Ranger/Texture Paste through the stencil and leave to dry...


Using the same circle die as before (plus one smaller), cut out a frame for the outside edge of the tag.


Then stamp out some more leaves and berries (as before).
Watercolour, cut them out and add to the tag.
(This creates a sense of depth and adds visual interest).


Add Walnut Stain and Hickory Smoke ink using a dauber to darken the texture paste, then add paint splatters using Holtz/Distress Paint (Stormy Sky).


Now glue on the robin you made earlier and add the word JOY from the Poinsettia die set.


And finally...


 Using your finger, daub on a little extra texture paste and add a bow made from twine...


Finished!


*


To make my circle 'cut outs' into a tag I have quite simply sandwiched the top of the bell from Christmassy between two circles of card.
 (Cut out two and glue together for extra strength).


*


Mixed Media is such fun to do!


*


I'm entering this into the following challenge:


Penny Black Saturday Challenge


*

Thanks for stopping by...


*


Donna. x

Thursday, 23 August 2018

Penny Black, Robin/Monochrome Berry Branch Tag, Guest DT 2018

This is the second of 12 posts that I will be sharing with you in celebration of the 
Penny Black 2018 Christmas release...

...  and as you can see, Robin takes centre stage on today's Christmas/Winter themed tag.


Here's a breakdown of supplies used:

  
*


Background


Penny Black/Stamps

30-247      Life's Journals 
 40-631      A Berry Branch 
          30-504      Christmas Sentiments

*


Method


Stamp 'Life's Journals' in Stazon - (Timber Brown).   Then, trim card to size.

Once dry...

Use a Stamping Platform and Tsukineko Markers (London Fog, Gray Flannel) to colour, stamp and mist 'A Berry Branch'.   

Leave to dry again, then...

Add the sentiment 'Winter Wishes' using Memento (Tuxedo Black) and emboss using 
Ranger Clear Embossing Powder.

Once dry, use (Hickory Smoke) and (Walnut Stain) from the Tim Holtz/Distress ink pad range to gently create a colour blend.

Then add paint splatters using Tim Holtz/Distress (Peeled Paint).


*


Robin

Penny Black/Stamp

 40-647      Robin's Christmas

*


Method

I used the following list of Tim Holtz/Distress markers to scribble on to an acrylic block and then watercolour with:

Vintage Photo
Walnut Stain
Hickory Smoke
Frayed Burlap
Pumice Stone
Ground Expresso
Aged Mahogany
Brushed Corduroy
Fossilized Amber
Wild Honey
Fired Brick
Spiced Marmalade


Once dry, fussy cut (unless you prefer to do as I did and cut prior to painting).

Then add a black gem for the eye using Ranger 'Glossy Accents' and seal using 
Ranger 'Multi Medium Gloss' or similar.


Glue the Robin into position on the tag, being sure to pen in the feet first!


*


As always, thank you so much for taking the time to stop by today...


*


Donna. x

Tuesday, 28 November 2017

Craft Consortium, Winter Woodland, Decoupage + Twine Christmas Card

I just love the Tartan Decoupage Paper that Craft Consortium sells, so for today's project 
I combined it with the wonderfully illustrated Winter Woodland paper pad...
...  and some of the front cover... 
...  inside front cover...
...  lace, twine, ribbon, toppers, resin flowers and a leaf.  

And I've thrown in some stitched die detailing, fussy cutting and distressed edges all for good measure.

This girl likes to add texture to her layered work, you know!


Here's a small breakdown of the base layer before I added the tag, twine and resin embellishments...


*


Start of with the Decoupage paper cut to size and glue into place.

Then cut the smaller square of white patterned paper.  (Acorn and Blue Berry Sprig) to size...  but DO NOT glue it down yet!

Cut a piece of Deer paper to the same size as the Acorn and Blue Berry Sprig, then using that piece of paper cut out two partial Stitched Circles shapes - using dies from your stash.  
Then glue this piece to the Acorn piece.

Cut a further partial Circle from the front cover of the paper pad and glue that into place as shown.

Once dry...

Distress the edges and glue into place on the card front.


Then...

Add a smaller Stitched Circle as shown top right.

Nest, cut a thin rectangular strip from the inside of the front packaging to size, add lace to it and then glue it into place as shown.

Then add the fussy cut Green Trailing topper, followed by an even smaller die cut Circle bottom left.


*


The rest should be self explanatory, but please feel free to email me if you have any questions...


I always use spray adhesive when adding decoupage papers to my craft work - with the exception of the first base layer on this card.

Why was this layer treated differently?

Because I wanted that 'loose edge' look, so I chose to use wet glue far away from that outside edge - knowing full well that it would be covered by those smaller square layers.

(There's a method to my madness, you know)!


*

Craft Consortium supplies used:

Winter Woodland

Decoupage Papers:

*

Other

Stitched Circle Die
Spray Adhesive
Wet Glue


*


I do hope that my 'out of the box' thinking with the twine being used as an embellishment hasn't scared you off!


Enjoy your day...


Donna. x

Monday, 13 November 2017

Craft Consortium, Winter Woodland, Stamped Robin/Window Shaker Tag

Have you seen the Flocking Powder that Craft Consortium sell?

My project for today focuses on whether or not Flocking Powder can be used as snow in a shaker - and the answer (to cut to the chase of it) is 'yes' and 'no'...

Confused?

Let me explain...

Yes, it does work.  
It's light and fluffy and white and it produces a lovely snowy effect - but because it's so light and fluffy it tends to stick rather than 'free fall'.

The solution is very simple.  

Mix in something coarser like glitter or small sequins from your stash... 
and you've got the best of both worlds!


I just love the fact that the Flocking Powder adds a more natural look to the 'snow'.

What do you think?


Here's a breakdown of how this was made...


*


You'll need two of these -
both covered in Decoupage paper using spray adhesive as the glue.

Take the windows out of the one and add a layer of acetate to the reverse side - 
using red liner tape to attach.

(Don't forget to add the hanging holes  - not pictured here)!

Keep the windows in the other and leave to one side for now.


You'll need four of these. 

Cut out and disregard all of the inner frameworks as shown, then ink around all edges of each frame (inside and out) in a colour that suits your Decoupage papers.

(Important - Add the hanging holes NOW before doing this next step)!

Glue one to the back of the Decoupage acetate window piece...
and the other three glue to each other to form a thick 'sandwich'.


You'll need just one of these!

I prefer to stamp out the image before cutting the card to size.
(I've used watercolour card and distress inks, then added some Glossy Accents to the berries and a very light splattering of white paint as 'snow').

Once this is dry and cut to size, simply attach to the back Decoupaged window piece of card.

Then add the sandwiched Window into place, followed by your Flock Powder mix, followed by your front acetate Window.

Add some weight on top (I generally use my cutting plates stack or some old stamp blocks) and leave to dry.


As for the topper?
That's from the packaging of the paper pad, fussy cut and layered up before adding lots of pearls and just a hint of...  you guessed it!
 Flocking Powder.


I've sprayed my topper (from the paper pad inner front cover) with a few coats of varnish and left it to dry before gluing it into place.
One Split Ring (from my own personal stash), some Twine and an Acorn Charm were all that was needed to finish...


*


Craft Consortium supplies used:

Winter Woodland

Always & Forever
Adhesive Pearls - 3mm

Decoupage Paper
This particular design is no longer in stock...  but they have plenty more to choose from!

*

Other supplies used:

Distress Ink
Peeled Paint
Broken China
Stormy Sky
Fired Brick
Festive Berries
Forest Moss
Twisted Citron
Ground Expresso
Frayed Burlap
Walnut Stain
Hickory Smoke

Distress Paint
Picket Fence

Frantage
Shaved Ice
Crystal

Stampin' Up
Chalk Marker

Ranger
Glossy Accents


*


So there you have it.

That's one more Decoupage paper project done and dusted...
but I have plans for more!


Stay warm...


Donna. x